
I’ve been working on something cool since yesterday afternoon. It’s taken up pretty much all my time since yesterday afternoon (all the way to night) and then today up to now. It’s not anything cool that I’ve created, but it’s something I wanted to try out for a while but only yesterday got into the “mood” for and then spent a lot of time trying to fit the pieces together to get it working.
So what do I want to do? I need an Azure Function for work that I’d like users to authenticate against using Azure AD. By default I can have Azure Functions authenticated against using various access keys. But I don’t want to use that as this is quite a sensitive Function (or it will be once I actually start working on it) so I’d not like to depend on static keys. What happens if someone leaves the firm – I’ll have to change keys and communicate to everyone. Or I’ll have to create separate keys per person for instance – too much trouble. I don’t know if there’s some limit to the number of keys too and that could be another stumbling block. Plus I’d have to maintain some store of keys and users if I want to work with them within the Function… I am too lazy for all that. 😵
In fact, I don’t actually need an Azure Function… but when I started thinking about authentication for this task I realized that Azure Functions is the only one that lets me have authentication via Azure AD. The other alternatives – Logic Apps and Automation Accounts – can be invoked by an HTTP request but have a fixed key. Azure Functions is more flexible in letting me have multiple keys, and it also supports Azure AD. Nice!
(Correction: My bad, turns out Logic Apps too can do Azure AD authentication. Haven’t tried this out yet but it looks like you need to define the claims and only those requests that match are authorized).
In addition I want the Azure AD authentication to use the Device Code flow. I don’t want the users of this Function to authenticate against Azure AD with their username/ password (the ROPC flow) and since this Function is meant to be an API rather than a website I want something they can just do entirely via command line (or a PowerShell script for instance).
Anyways, here’s how one can enable Azure AD authentication against an Azure Function. My Function uses PowerShell so I have to do things slightly different as most instructions just assume you are using C# and I don’t know C# nor wanted to figure that out just for this piece.
Enable Authentication in the Azure Function
Under the Settings > Authentication you can “Add identity provider”.
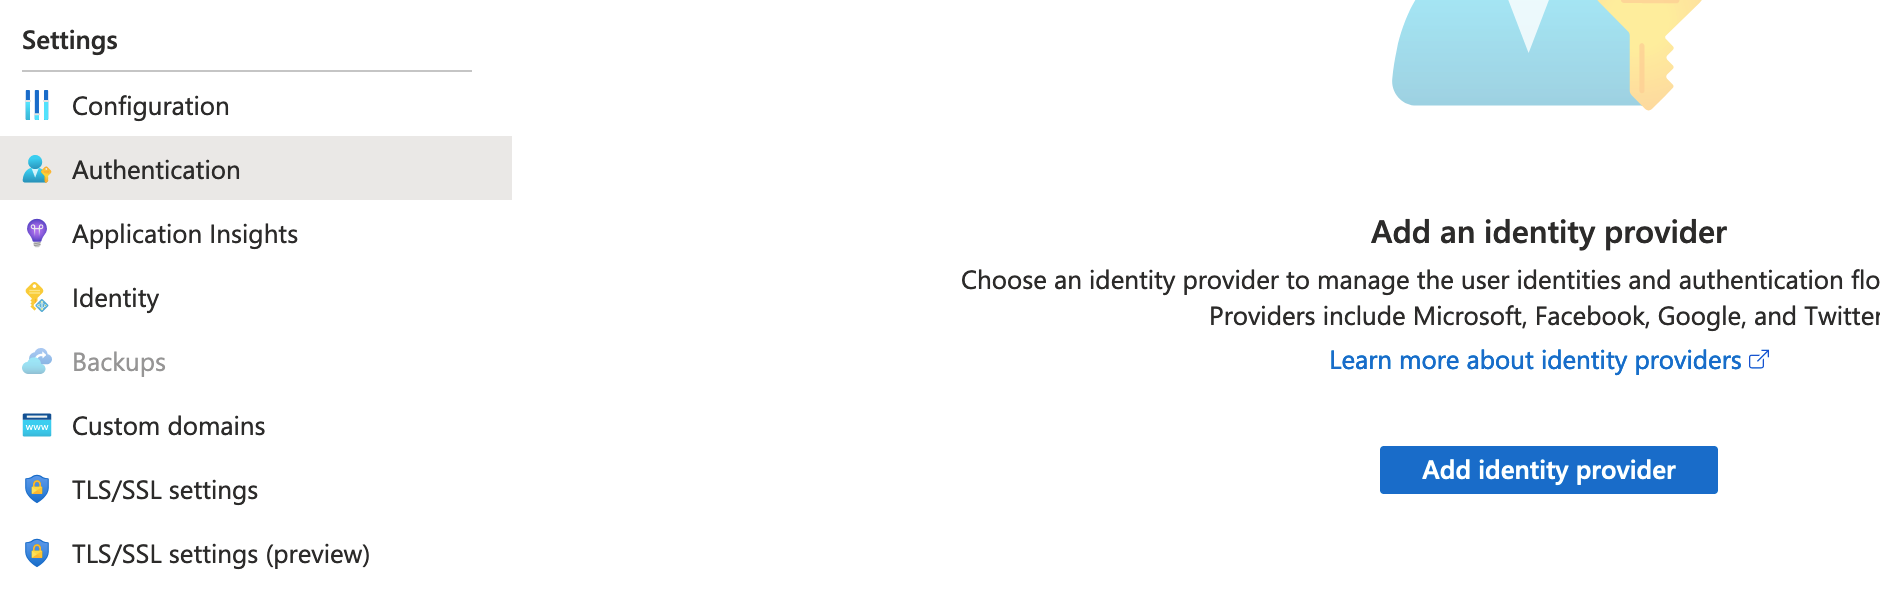
Select “Microsoft” and follow along to create the App Registration. Here’s what I went with (mostly the default except changing to “HTTP 401”).
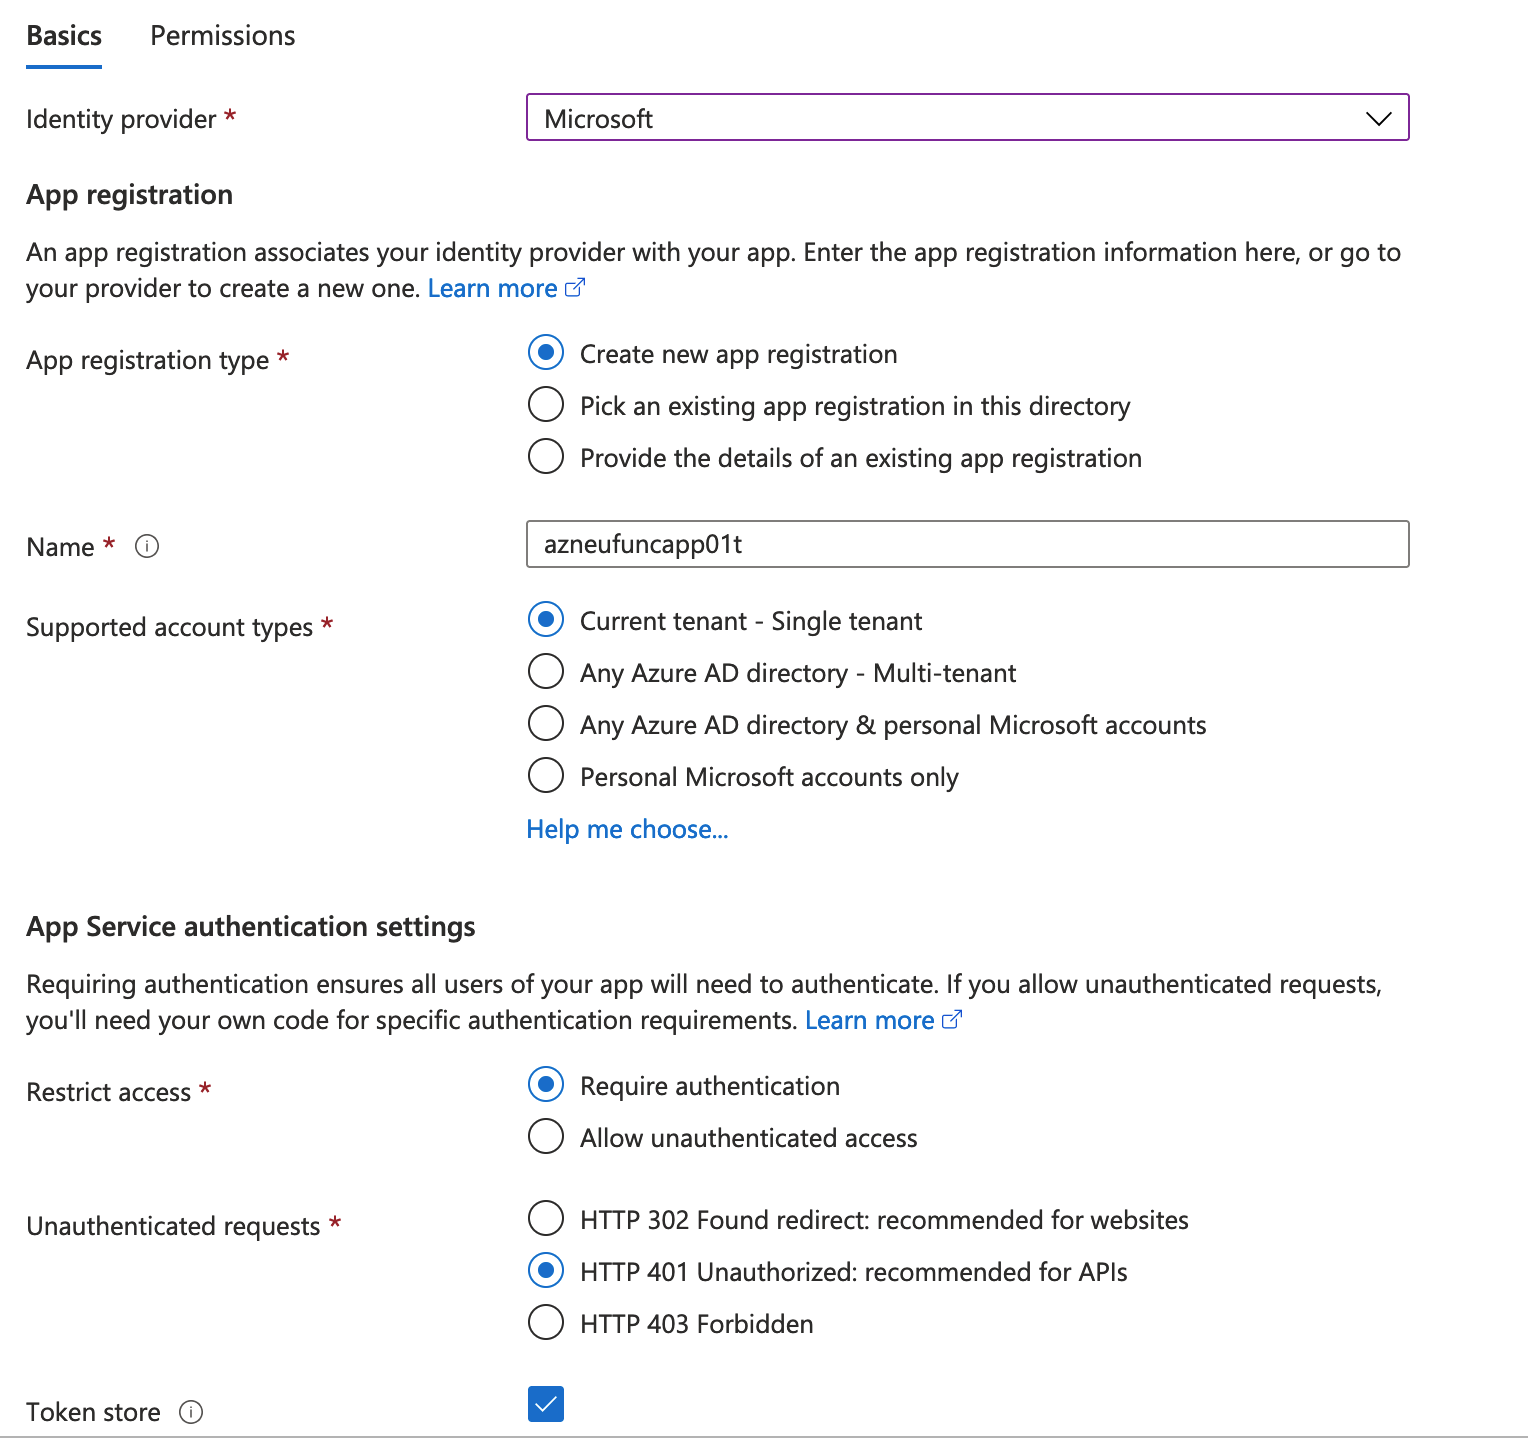
Initially I disabled the Token store. I got the impression it was just some place the tokens were stored and I could retrieve or refresh them, and I didn’t see a reason why I might need to do that.
Later I enabled the Token store. I’ll elaborate the reason for that later, but for now leave it enabled. Let’s go with the default permissions (on the next screen) for now. Will add to it later.
That’s all!
The App Registration
I’ll include screenshots of the App Registration that gets created so we know what is setup by default. This is for anyone who creates the App Registration manually (better to Google and I am sure there’s official Microsoft instructions on the same) but also coz I’ll be making some changes to the defaults.
First up, the “Authentication” setting of the App Registration.
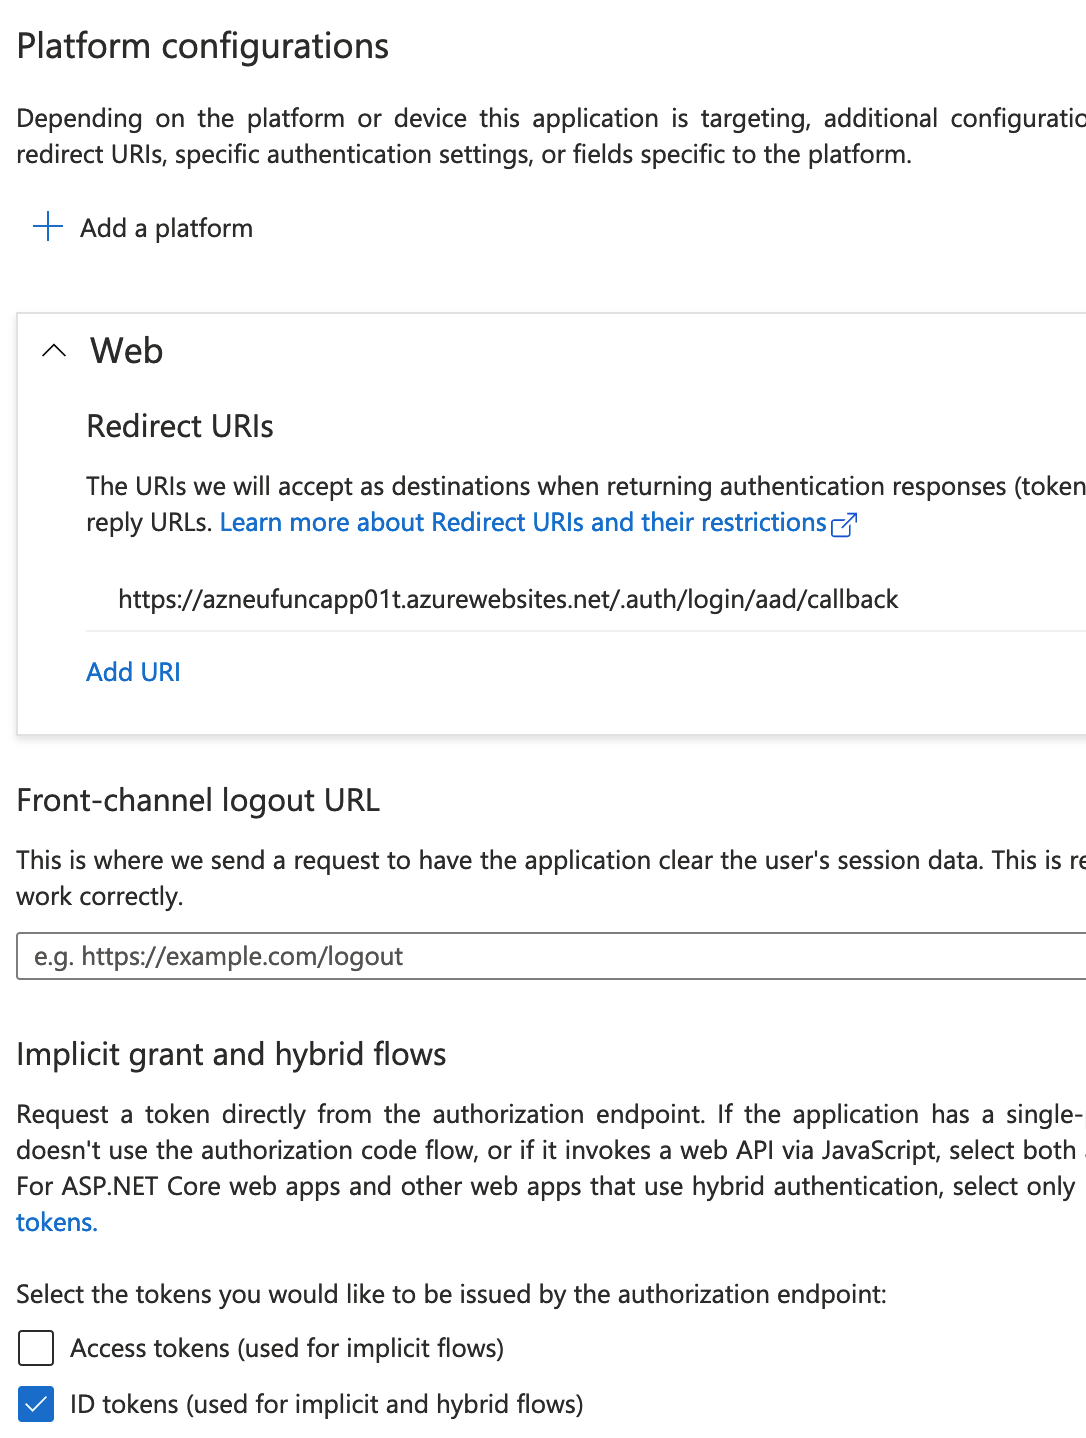
Things to note:
The Redirect Url. This is the Function Url with “/.auth/login/aad/callback” tacked on to it. The “aad” bit would be different if I hadn’t used Azure AD and went with Google for instance. What this tells Azure AD is that if it is replying with the authentication tokens to an Url then only accept the above Url as a destination. I don’t really use that Url but it’s good to know what it is there for.
The flow of authentication when using Azure AD or similar is that when a user visits a Function app and is unauthenticated they are redirected to the “/.auth/login/<provider>” Url to login (where “<provider>” would have been “aad” in my case). Once the user authenticates there (i.e. with Azure AD in my case) they are redirected to “/.auth/login/aad/callback” and that’s where the tokens they get from the provider are consumed. This Url then returns its own token and that is what one sets in a header (X-ZUMO-AUTH) to actually authenticate against the Function.
Note that extra step: the authentication tokens from Azure AD cannot be used to directly authenticate with a Function. It has to be sent to a different Url and exchanged for a token the Function expects. All this and more are in the official docs if you are interested in more details.
Now, typically you’d be using an SDK and that’ll take care of all this for you. :) Or you’d have the HTTP 302 redirect turned on and that’ll take you to the “/.auth/login/<provider>” – but remember I turned that off above (as I am going to be using this as an API and so redirecting doesn’t make sense). Thus I have to do all these manual steps myself.
Anyways, so that’s the reason for the Reply Url in the App Registration and why it doesn’t matter much to me.
The “Implicit grant and hybrid flows” section doesn’t matter as we are not using that. (In an Implicit flow you get tokens from an /authorize endpoint and these can be Access Tokens or ID Tokens or both; that’s what this setting decides but we don’t care as we are not using this Flow).
Further down on the same page we have “Public flows“:
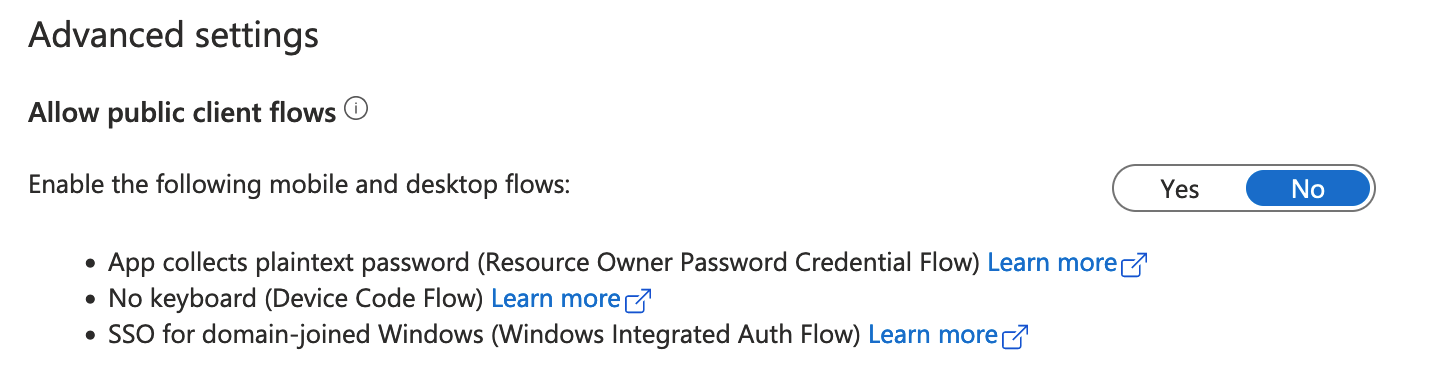
Toggle this to “Yes” as we will be using the Device Code flow. (Don’t forget to click “Save” after doing this!)
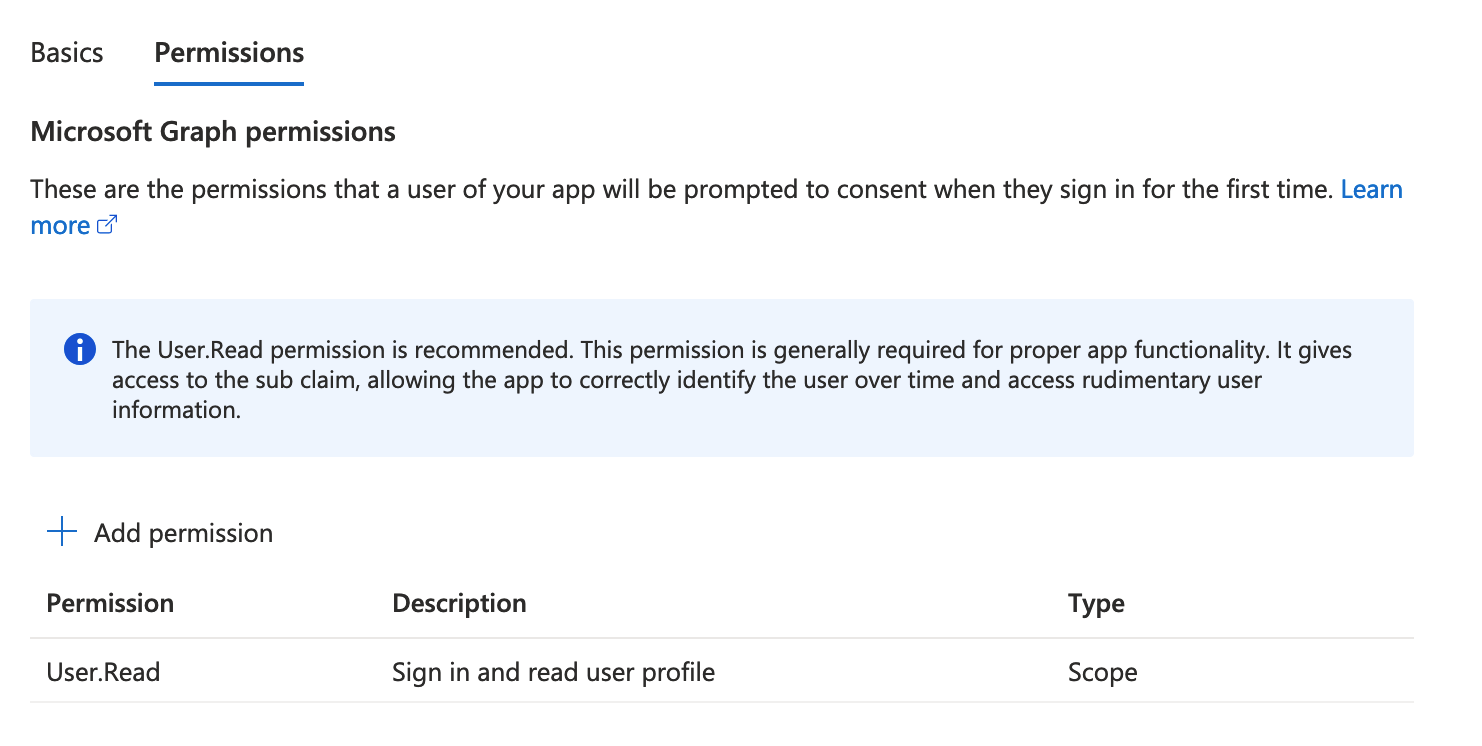
Next up is the API permissions, which has the sole permission we granted earlier:

Go ahead and add the “profile” permission here. This is a delegated permission. Graph. OpenId permissions.
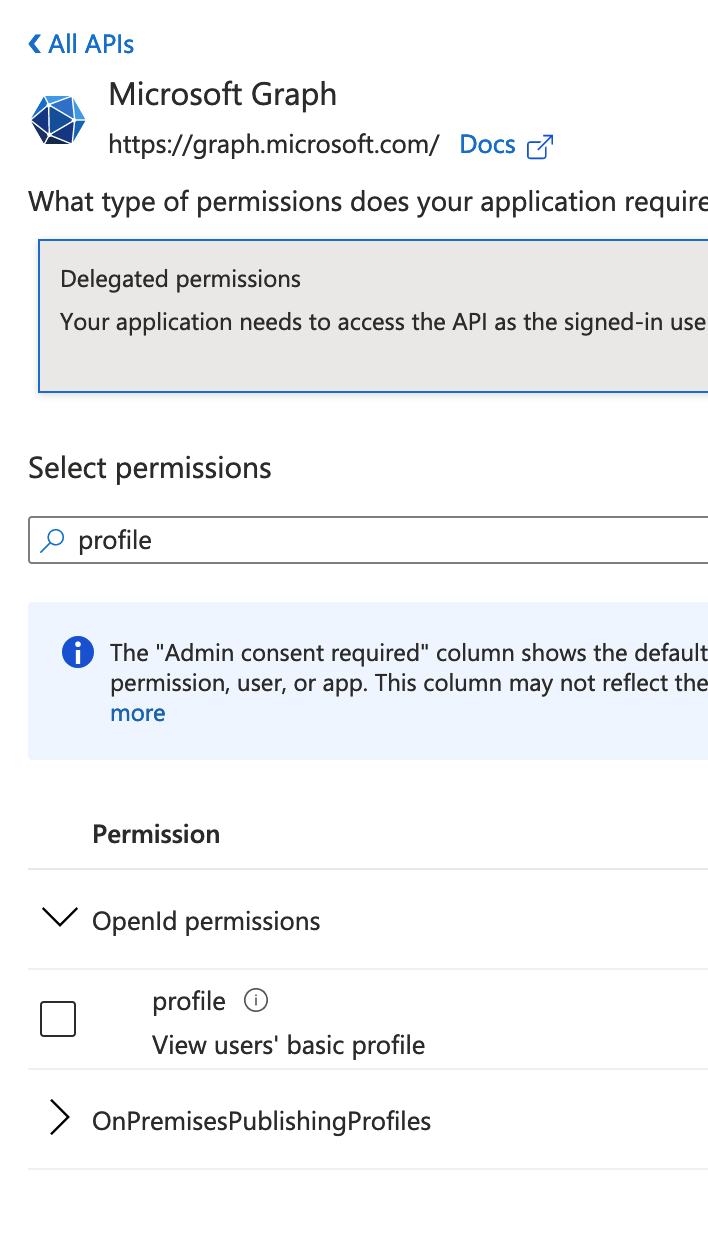
And do an “Admin Consent” so both permissions are consented to. If not users will get an “Approval Required” message when trying to authenticate.
The “profile” permission is required because without it the claims from Azure AD don’t contain any user info. Here’s what I get in my ID token without “profile”:
|
1 2 3 4 5 6 7 8 9 10 11 12 13 14 15 16 17 |
{ "typ": "JWT", "alg": "RS256", "kid": "l35Q-50cCH4xBVZLHTGwnSR7680" }.{ "aud": "4b2a108b-829c-4c56-889a-30cd226dfb6b", "iss": "https://login.microsoftonline.com/xxxxxx/v2.0", "iat": 1637837091, "nbf": 1637837091, "exp": 1637840991, "aio": "AVQAq/8TAAAANSQQ/rpVIlXZf7TT5zdHNfvQu8V1t/xVrkBS+M9oZd5mNYhL+3cmuM1yOOosGtZuzp6sN1INRBgEdy95ODiWa1ziLGbti1PC/DoYQL6MPqQ=", "rh": "0.ARsAEbFJPNsZjUWD_xrwrJrjW4sQKkucglZMiJowzCJt-2obADU.", "sub": "A1w9raaA8r-C5LwmKNYAXc_IiRFRaWB2VOTpSgUfsDo", "tid": "xxxxxx", "uti": "qOrkOFFjTk-irWB3d8niAA", "ver": "2.0" }.[Signature] |
While this is fine if all I care about is only allowing authenticated access to the Function, sometimes one would also like to know who it is that’s accessing the Function. That is to say, maybe I’d like to know from within the Function that it is user “xyz” who is accessing it so maybe I can treat them differently or make a log entry of it somewhere…
To get that info I have to enabled the “profile” permission. Then I get claims like these:
|
1 2 3 4 5 6 7 8 9 10 11 12 13 14 15 16 17 18 19 20 |
{ "typ": "JWT", "alg": "RS256", "kid": "l3sQ-50cCH4xBVZLHTGwnSR7680" }.{ "aud": "4b2a108b-829c-4c56-889a-30cc226dfb6a", "iss": "https://login.microsoftonline.com/xxxxxx/v2.0", "iat": 1637838161, "nbf": 1637838161, "exp": 1637842061, "aio": "AVQAq/8TAAAAFmecOMAgg7ysp0WBTLHm3DIhfbJAlR79mytu7CPbcxqqATsFy5SiGE1+c/t7p4oDmUpqagdUh7erIXgcBF/43ZWzUOBfZW7xbj3LOQ29Grk=", "name": "Sasidharan, Rakhesh", "oid": "c0e23fb1-656c-2a14-833d-3d5bb517e0f3", "preferred_username": "rakhesh.sasidharan@awesomepossum.com", "rh": "0.ARsAEbFJPNsZjUWD_xrwrJrjW4sQKkucglZMiJowzCJt-2obADU.", "sub": "A1w9raaA8r-C5LwmKNYAXc_IiRARa2B2VOTpSgUfsDo", "tid": "xxxxx", "uti": "1dS46_iGhkagyzJ5QmbSAA", "ver": "2.0" }.[Signature] |
Better, right? I get the username (UPN) and also the id (oid) which I can use to lookup the user in Graph or Azure AD. I also get the Name (name)… wunderbar!
There’s also some stuff in the “Expose an API” section… there’s nothing to change there. 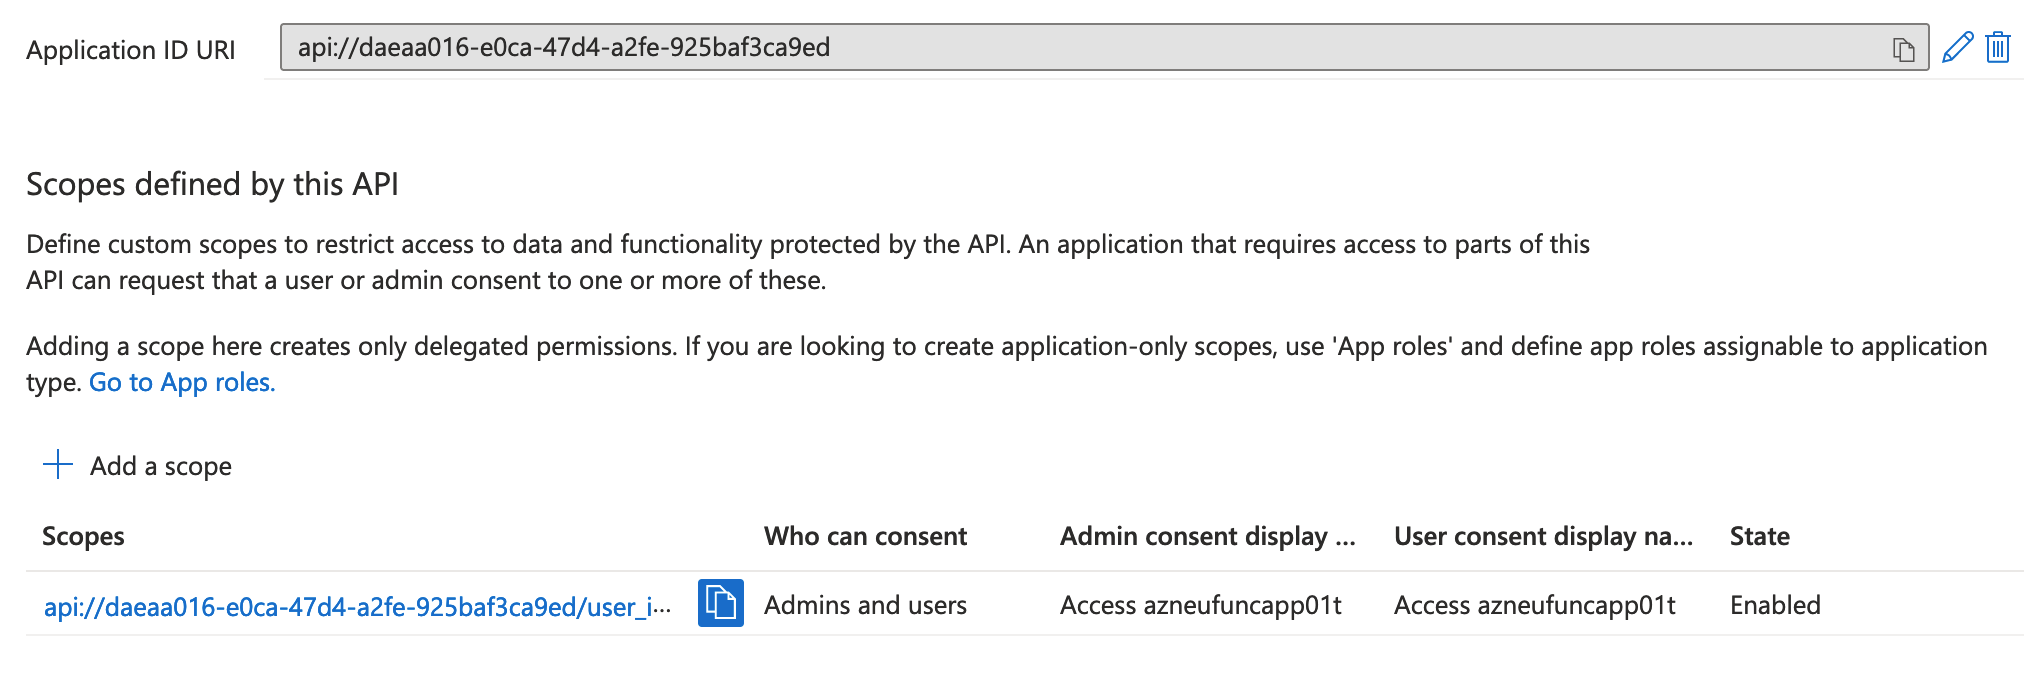
Great, that’s that!
Azure Function
Let’s create an Azure Function with the HTTP trigger. Be sure to set its Authorization to be “Anonymous”. I don’t want the Function to require authorization as that will be handled by the overall Function App.
Can I access it now? Nope.

Cool, that’s as expected.
Authenticating via Device Code flow
Ok so now let’s try and get authenticated.
As I said earlier I want to use the Device Code flow. This requires sending a POST request to a specific Url, getting a code, signing in to a browser using that code (and authenticating yourself), then putting the return code in another Url to get the ID Token. Standard stuff basically.
I’ll be putting some code below so let me define a few variables I’ll be using as we go along:
|
1 2 3 4 5 6 7 8 9 10 11 12 |
# Tenant ID $tenantId = "ac2d9f08-a46d-37f2-a9a5-54f7aa2f38bf" # App Registration ID $appId = "daeaa016-e0ca-47d4-a2fe-925baf3ca9ed" # The Url of the Function. Just the base as we'll be appending to it later. $apiBaseUrl = "https://azneufuncapp01t.azurewebsites.net/" # The Azure AD login Url $authUrl = "https://login.microsoftonline.com/$tenantId" # The Url to my Function. This is the Url I am trying to access. It includes the base name above and the actual Function. $apiUrl = "$apiBaseUrl/api/HttpTrigger1" |
Do go through the Device Code flow document as everything will make much more sense from there. That’s a great document!
First step is to kick off the process via the /devicecode endpoint. This involves sending a POST request to that endpoint with the Tenant ID, the App Registration ID, and the Scopes we are interested in. I am interested in User.Read, Profile, and openid. I mentioned the first two earlier – User.Read is to sign the user in and read their profile; Profile is required so the ID Tokens contain the user details like oid etc. And openid is needed so we get an ID token in the first place!
Initially I had missed requesting for openid and profile with the result that I was only getting an access_token in my response. It was only after spending some time that I realized of course ID Tokens need the openid scope and while I didn’t have to grant that in the App Registration I do have to include that in the scope to get an ID Token! (I had spent some time a few months ago reading up on all this… and meant to write a blog post explaining it all to myself, but never got around to it).
Anyways, to recap: send a POST to the above endpoint. Ask for the 3 scopes.
|
1 2 3 4 5 6 7 8 9 10 11 12 |
$authBody = @{ "tenant" = "$tenantId"; "client_id" = "$appId"; "scope" = "User.Read openid profile" } $response = Invoke-RestMethod -Method POST -Uri "$authUrl/oauth2/v2.0/devicecode" -Body $authBody Write-Output $response.Message Set-Clipboard -Value $response.user_code Write-Output "The code is copied to your clipboard for ease of use." |
The $response variable contains the following: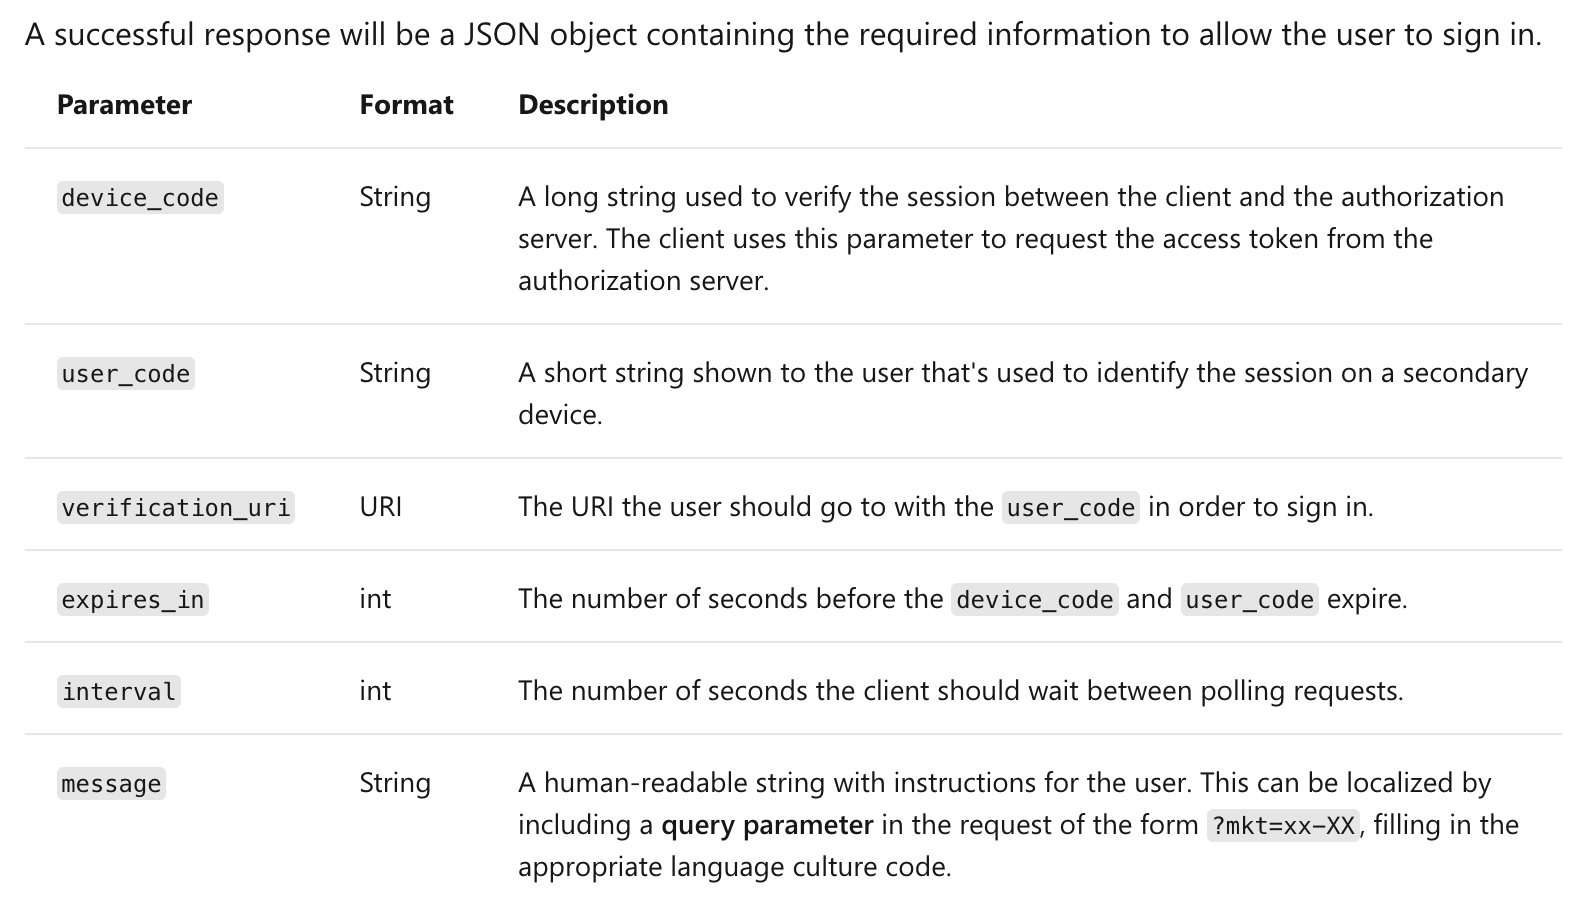
So as part of my script I output the message (looks like To sign in, use a web browser to open the page https://microsoft.com/devicelogin and enter the code DH5XSAKDS to authenticate.) and just to make it easy I copy the code to the clipboard. :)
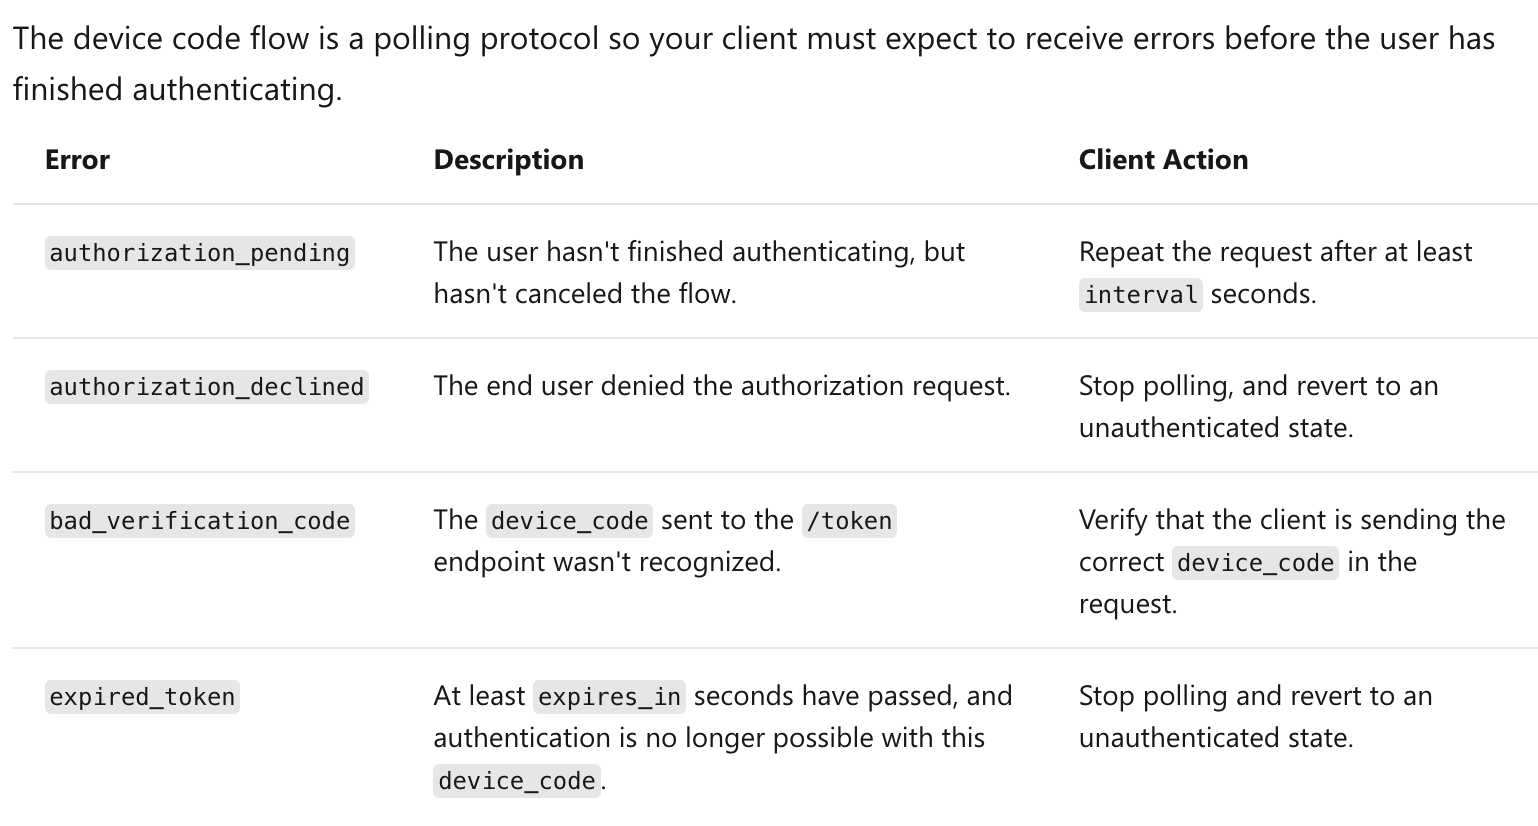
After this one has to POST to the /token endpoint and if the user has authenticated we’ll get the ID Token (or not if you forgot the scopes as above! 😃), while if the user has not authenticated yet we’ll get a reponse to wait.
I thus have the following code:
|
1 2 3 4 5 6 7 8 9 10 11 12 13 14 15 16 17 18 19 20 21 22 23 24 25 26 27 28 29 30 31 32 33 34 35 36 |
$authBody2 = @{ "tenant" = "$tenantId"; "grant_type" = "urn:ietf:params:oauth:grant-type:device_code"; "client_id" = "$appId"; "device_code" = $response.device_code } $authStatus = "waiting" $response2 = $null while ($authStatus -eq "waiting") { # Try to get the access token. if we encounter an error check the reason. # If the reason is we are waiting then sleep for some time. # If the reason is the user has declined or we timed out then quit. try { $response2 = Invoke-RestMethod -Method POST -Uri "$authUrl/oauth2/v2.0/token" -Body $authBody2 } catch { switch (($Error[0].ErrorDetails.message | ConvertFrom-Json).error) { "authorization_pending" { Write-Output "Sleeping 30 seconds for browser authentication to complete." Start-Sleep -Seconds 30 } "authorization_declined" { Write-Output "Quitting as authorization was declined in browser." $authStatus = "failed" } "expired_token" { Write-Output "Authentication timed out." $authStatus = "failed" } } } if ($authStatus -eq "failed") { exit 1 } if ($null -ne $response2) { $authStatus = "success" } } |
I am pretty pleased I spent time writing this. It will sensibly wait while I login to the Url in my browser, and once I do that it will get the ID token from the endpoint. I like how I used the try catch block to do a switch of the Error Message. It’s the little things… 😊
When this exits $response2 has the ID Token.
Just to emphasize: the $response2 variable has both ID Token and Access Tokens but it is the former we want. If that is missing check your scopes. Both look similar when you decode the contents but Access Tokens won’t help here. In fact the documentation is not very clear on that point either and this is yet another area where I spent many hours figuring out why things weren’t working. Initially I had forgotten to add the openid scope and was getting only Access Tokens and I was trying to proceed with that and failing.
(Update: Access Tokens won’t help because they have an audience (aud claim) for Graph. Only ID Tokens have the audience sent to the App Registration ID).
Authenticating against the Function middleware
As mentioned earlier the authentication flow of Functions with Azure AD is to send the tokens to the “/.auth/login/aad” endpoint. This is part of the Function middleware and is independent of the acutal Function code.
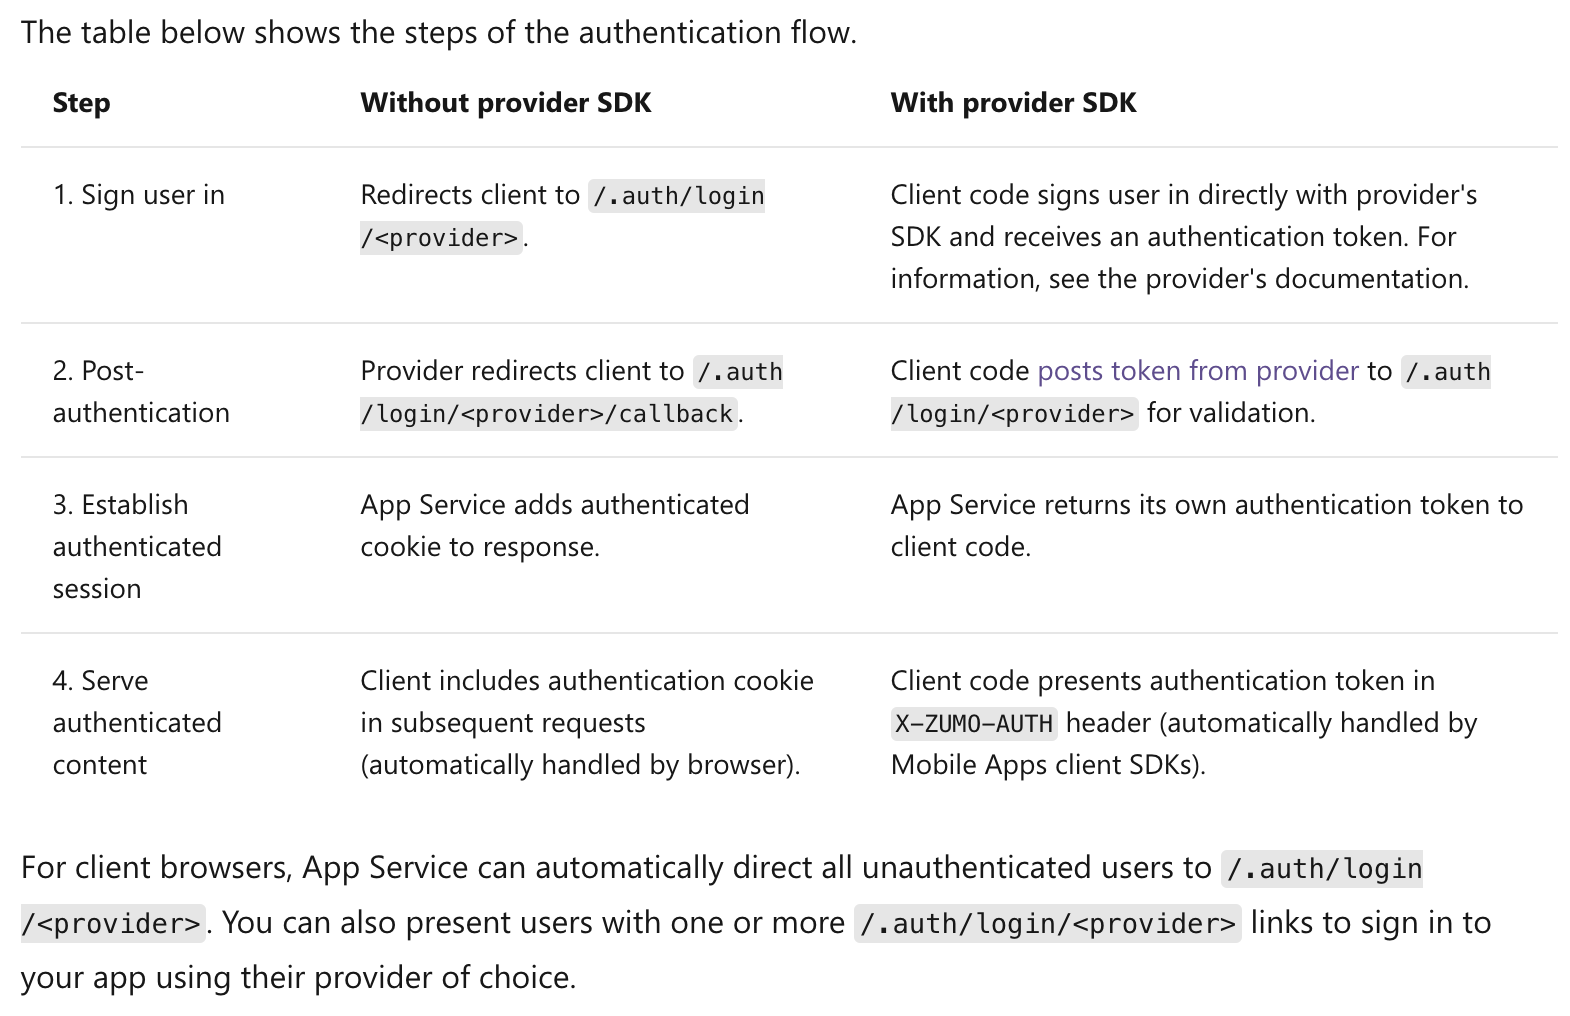
But it doesn’t clarify that it is looking for the ID Token. In fact, a follow on link from that document has the following:
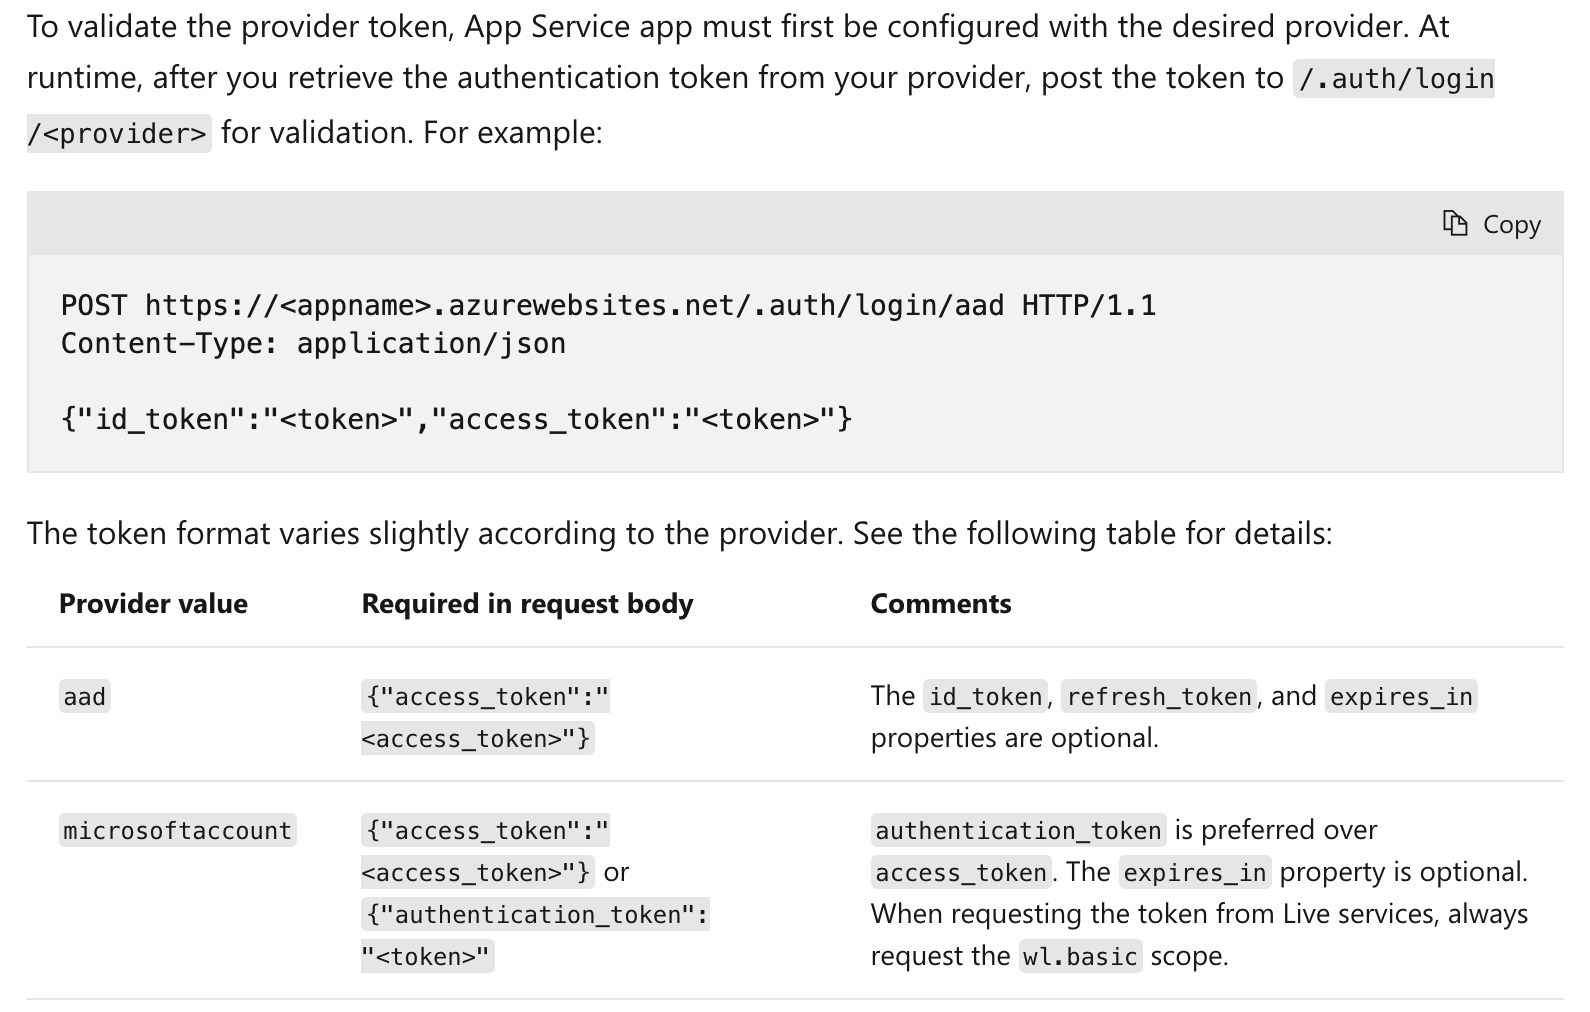
The required property in the body is called “access_token” for goodness sakes!! But it actually needs the ID Token. If you try to pass the Access Token instead it gives an error:
|
1 2 3 4 5 6 |
Write-Output "Exchanging token." $response3 = $null $authBody3 = @{ "access_token" = $response2.access_token } $response3 = Invoke-RestMethod -Method POST -Uri "$apiBaseUrl/.auth/login/aad" -Body (ConvertTo-Json $authBody3) -ContentType "application/json" |
Invoke-RestMethod: You do not have permission to view this directory or page.
On the other hand this works:
|
1 2 3 4 5 6 7 8 9 10 11 12 13 14 |
# Based on https://docs.microsoft.com/en-us/azure/app-service/configure-authentication-customize-sign-in-out#client-directed-sign-in Write-Output "Exchanging token." $response3 = $null $authBody3 = @{ "access_token" = $response2.id_token } $response3 = Invoke-RestMethod -Method POST -Uri "$apiBaseUrl/.auth/login/aad" -Body (ConvertTo-Json $authBody3) -ContentType "application/json" Write-Output "Calling Function" $header = @{ "X-ZUMO-AUTH" = $response3.authenticationToken } Invoke-RestMethod -Method GET -Uri $apiUrl -Headers $header |
Another thing which always bites me in the a$$ with Invoke-RestMethod is that it correctly converts a hash table sent as header to JSON but doesn’t do the same for the body. So if I had the following code instead it would fail:
|
1 2 |
# Note no ConvertTo-Json $response3 = Invoke-RestMethod -Method POST -Uri "$apiBaseUrl/.auth/login/aad" -Body $authBody3 -ContentType "application/json" |
Invoke-RestMethod: Bad Request
I’ve to thank Postman for making me realize this. When running out of ideas and Google results I turned to Postman to make the same query and realized that I’d get the same error if I didn’t send it as JSON… which got me thinking that even though my content type was “application/json” it’s possible the $authBody3 hash table wasn’t being converted to JSON by Invoke-RestMethod. Adding a ConvertTo-JSON fixed that.
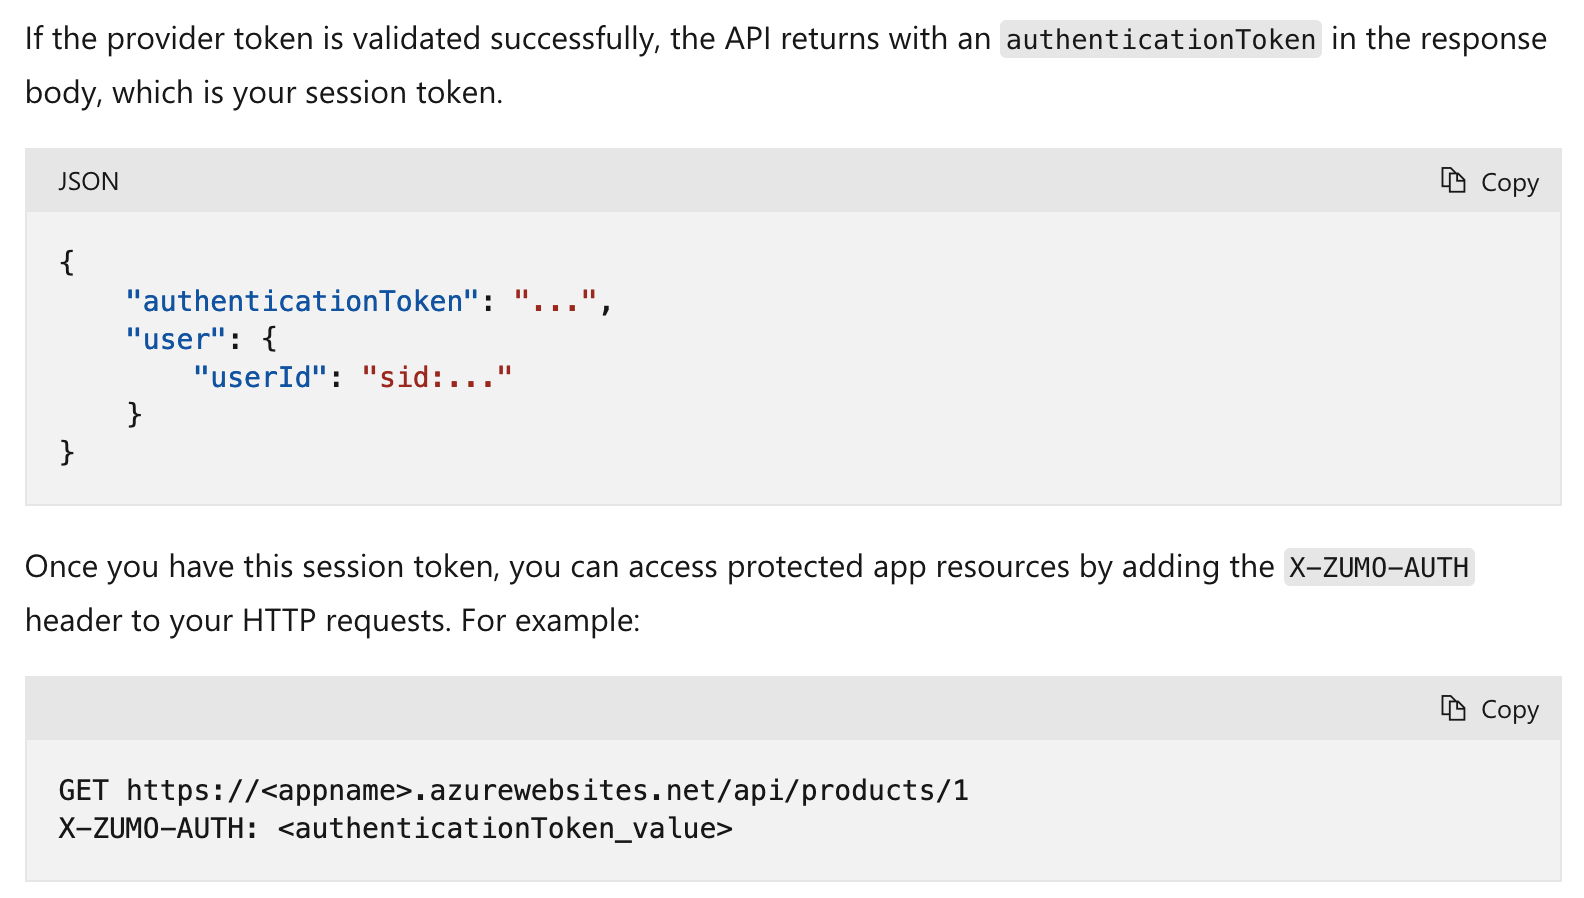
Anyways, if you send the ID Token over correctly, the “/.auth/login/aad” endpoint returns a correct response. So all one needs to do is put that in the appropriate header when calling the Function. Which is what my code snippet above does.
The Script
Since the gave the script in bits and pieces above here’s the full version:
|
1 2 3 4 5 6 7 8 9 10 11 12 13 14 15 16 17 18 19 20 21 22 23 24 25 26 27 28 29 30 31 32 33 34 35 36 37 38 39 40 41 42 43 44 45 46 47 48 49 50 51 52 53 54 55 56 57 58 59 60 61 62 63 64 65 66 67 68 69 70 71 72 73 74 75 76 77 78 79 80 81 |
# Tenant ID $tenantId = "ac2d9f08-a46d-37f2-a9a5-54f7aa2f38bf" # App Registration ID $appId = "daeaa016-e0ca-47d4-a2fe-925baf3ca9ed" # The Url of the Function. Just the base as we'll be appending to it later. $apiBaseUrl = "https://azneufuncapp01t.azurewebsites.net/" # The Azure AD login Url $authUrl = "https://login.microsoftonline.com/$tenantId" # The Url to my Function. This is the Url I am trying to access. It includes the base name above and the actual Function. $apiUrl = "$apiBaseUrl/api/HttpTrigger1" # Details of Url from https://docs.microsoft.com/en-us/azure/active-directory/develop/v2-oauth2-device-code # I need 'profile' scope for oid # I need 'openid' scope to get the id_token else that is not returned $authBody = @{ "tenant" = "$tenantId"; "client_id" = "$appId"; "scope" = "User.Read openid profile" } $response = Invoke-RestMethod -Method POST -Uri "$authUrl/oauth2/v2.0/devicecode" -Body $authBody Write-Output $response.Message Set-Clipboard -Value $response.user_code Write-Output "The code is copied to your clipboard for ease of use." $authBody2 = @{ "tenant" = "$tenantId"; "grant_type" = "urn:ietf:params:oauth:grant-type:device_code"; "client_id" = "$appId"; "device_code" = $response.device_code } $authStatus = "waiting" $response2 = $null while ($authStatus -eq "waiting") { # Try to get the access token. if we encounter an error check the reason. # If the reason is we are waiting then sleep for some time. # If the reason is the user has declined or we timed out then quit. try { $response2 = Invoke-RestMethod -Method POST -Uri "$authUrl/oauth2/v2.0/token" -Body $authBody2 } catch { switch (($Error[0].ErrorDetails.message | ConvertFrom-Json).error) { "authorization_pending" { Write-Output "Sleeping 30 seconds for browser authentication to complete." Start-Sleep -Seconds 30 } "authorization_declined" { Write-Output "Quitting as authorization was declined in browser." $authStatus = "failed" } "expired_token" { Write-Output "Authentication timed out." $authStatus = "failed" } } } if ($authStatus -eq "failed") { exit 1 } if ($null -ne $response2) { $authStatus = "success" } } "== ID Token ==" $response2.id_token # Based on https://docs.microsoft.com/en-us/azure/app-service/configure-authentication-customize-sign-in-out#client-directed-sign-in Write-Output "Exchanging token." $response3 = $null $authBody3 = @{ "access_token" = $response2.id_token } $response3 = Invoke-RestMethod -Method POST -Uri "$apiBaseUrl/.auth/login/aad" -Body (ConvertTo-Json $authBody3) -ContentType "application/json" "== Exchanged Token ==" $response3.authenticationToken $header = @{ "X-ZUMO-AUTH" = $response3.authenticationToken } Invoke-RestMethod -Method GET -Uri $apiUrl -Headers $header |
I feel so Web 1.0 putting a script in a blog post. The cool kids put it as a Gists in GitHub nowdays… I know. 🙂
Getting User Details
We are not done yet. With the above I am now able to restrict my Function to only Azure AD authorized users. I can limit this to specific groups or users by going to the “Enterprise Application” of the App Registration and locking it down there (this is standard Azure AD stuff so I am not going into details).
Within the Function though how do I get the details of the authenticated user? According to the official docs I am supposed to see these as headers. Or if I was using C# there’s a ClaimsPrincipal class I can use. For PowerShell (and others) sadly headers are my only option.

What headers do I get? I can see these in the $Request.Headers variable within a Function as these are bound to the Request object. Here’s what I get in my Function:
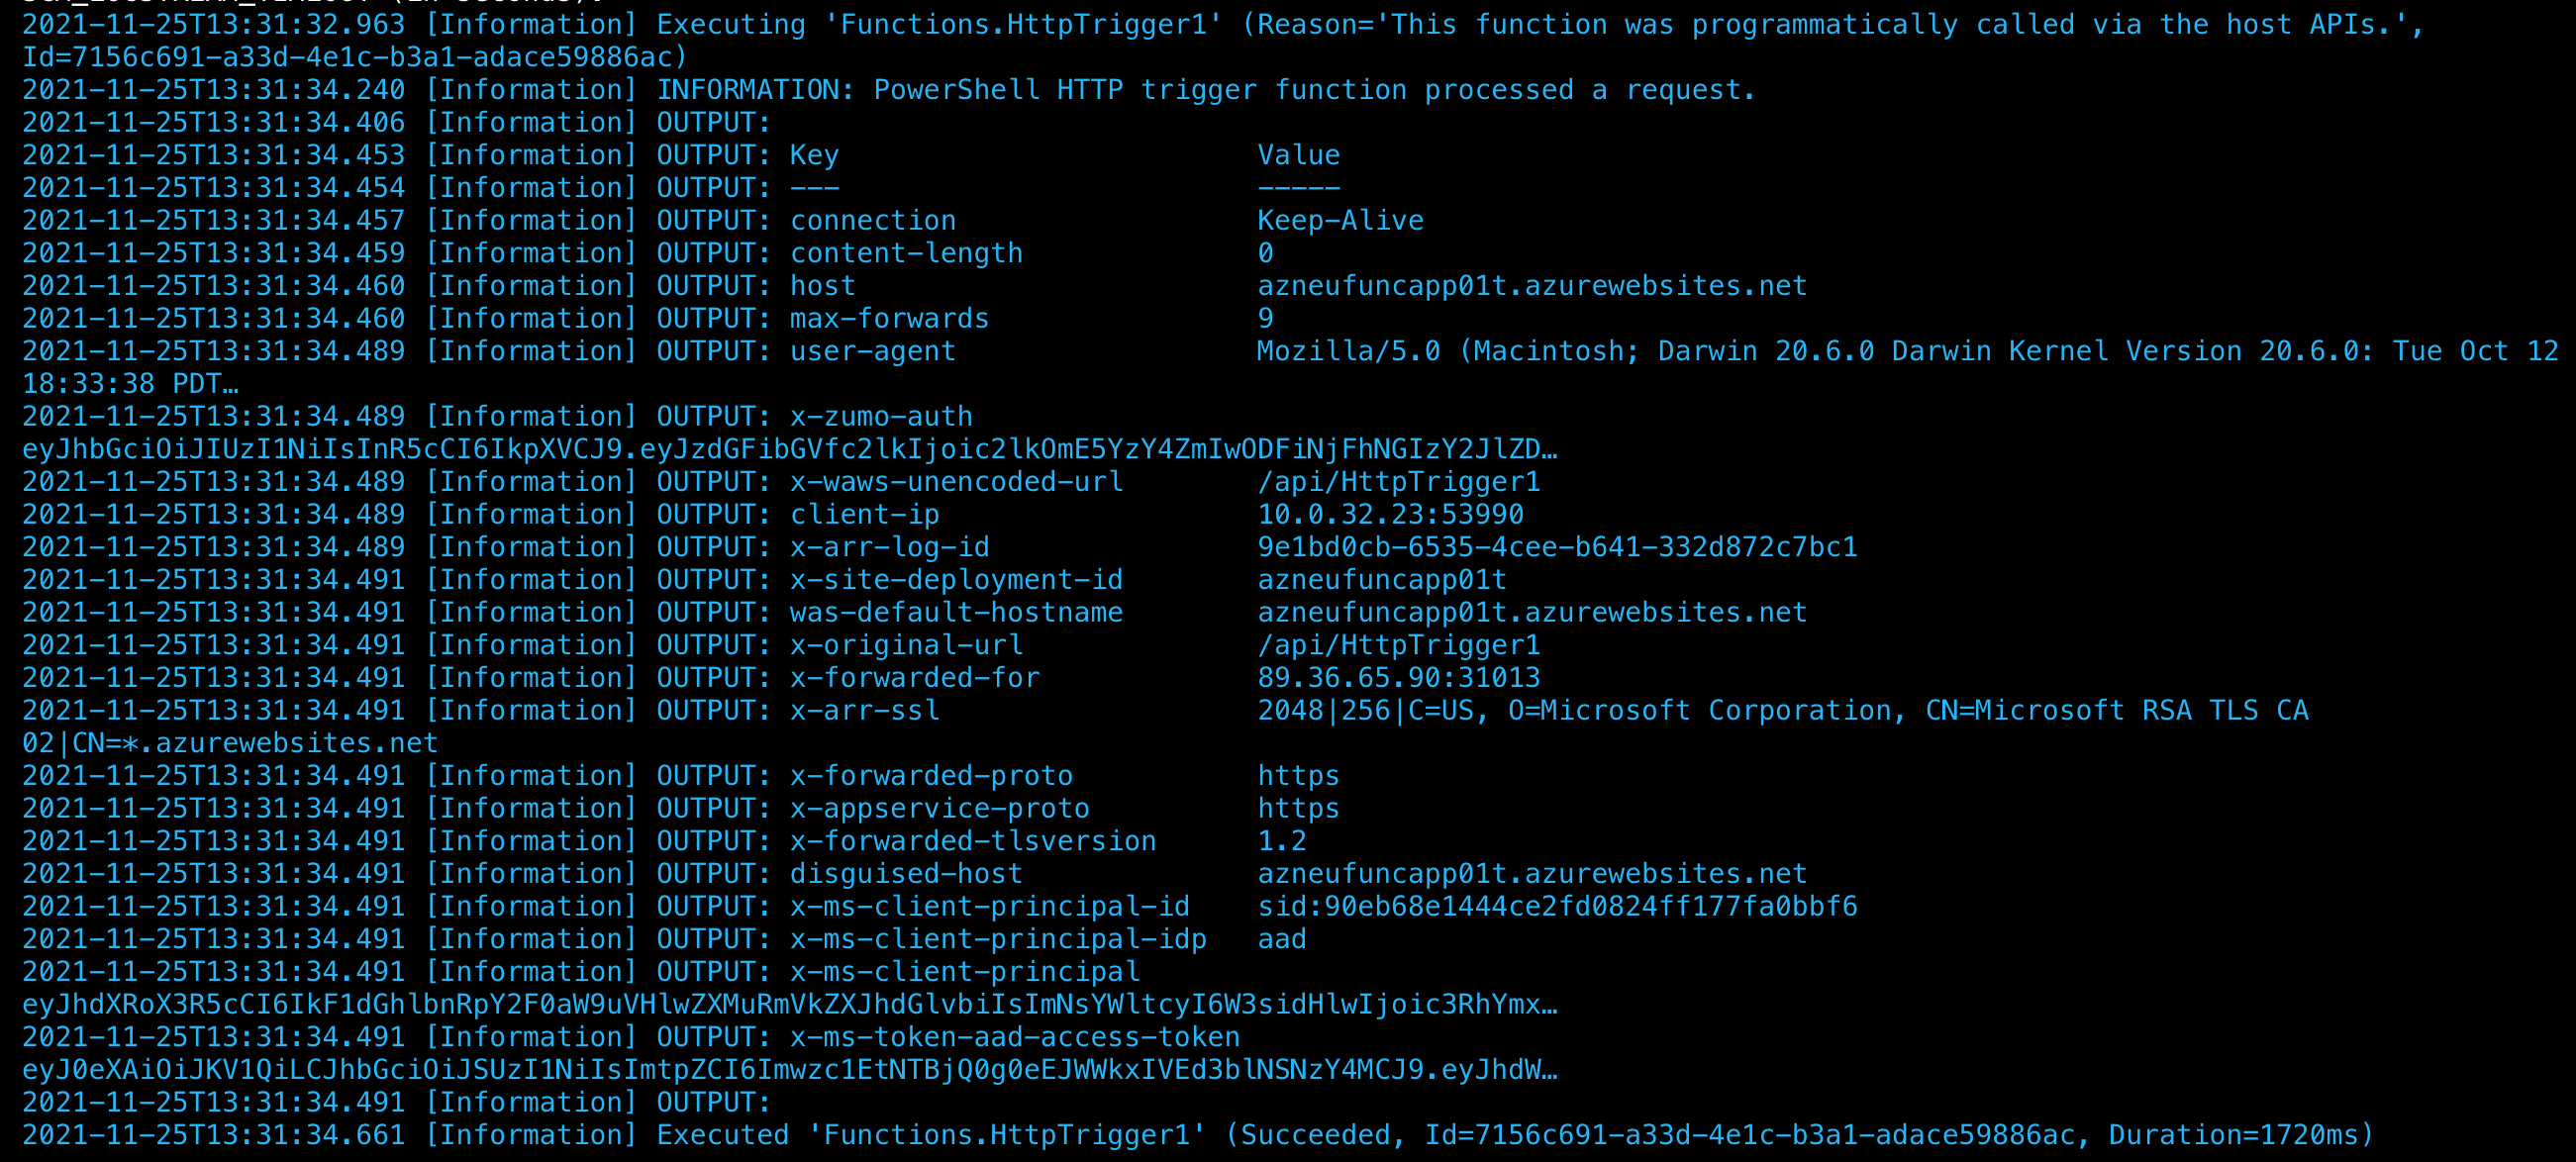
Hmm, not much. I am supposed to get these two headers according to the docs:
- X-MS-CLIENT-PRINCIPAL-NAME
- X-MS-CLIENT-PRINCIPAL-ID
I see the ID but that has no relation to my actual User Object GUID or anything in Azure AD. It seems to be a transient one as it keeps changing. I was hoping the NAME one would at least give a UserName or something but it is nowhere to be found.
Two headers are worth noting: X-MS-CLIENT-PRINCIPAL and X-MS-TOKEN-AAD-ACCESS-TOKEN. The former has the token I got from the “/.auth/login/aad” endpoint. It is a JWT and doesn’t have anything useful (to me at least haha):
|
1 2 3 4 5 6 7 8 9 10 11 12 13 14 |
{ "alg": "HS256", "typ": "JWT" }.{ "stable_sid": "sid:a9c68fb081b61a4b3cbed5b064708dc8", "sub": "sid:90eb68e1444ce2fd0824ff177fa0bbf6", "idp": "aad", "ver": "3", "nbf": 1637847092, "exp": 1640439092, "iat": 1637847092, "iss": "https://azneufuncapp01t.azurewebsites.net/", "aud": "https://azneufuncapp01t.azurewebsites.net/" }.[Signature] |
Note that the “sub” claim matches X-MS-CLIENT-PRINCIPAL-ID. That’s the only interesting thing I could see.
The X-MS-TOKEN-AAD-ACCESS-TOKEN header, on the other hand, has my ID Token. But the important point to note about this is that it only appears if the Token Store is enabled (hence I enabled it earlier when setting up Authentication). As per the docs once Token Store is enabled we should see these headers:
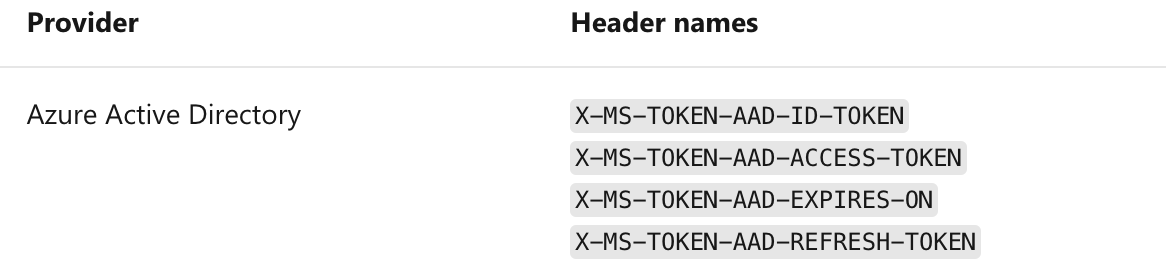
I don’t see the other three but at least I have the important one. Why important? Because the ID Token is the one with the oid and other claims as we noticed above. Technically one is not supposed to examine an ID Token coz even though it is currently JWT it could change anytime… but what the heck, it is something to go by. (Correction: ID Tokens are always JWT; I was confusing with Access Tokens which needn’t be JWT).
The JWT has three parts – a header, body, and signature – all separated by dots. Each of these is in Base 64. So if I split the JWT along dots, take the second bit, convert the Base 64 to get JSON, then convert this JSON to a Hash Table I should be able to extract the claims. So let’s do that in the function to output my name as I authenticate:
|
1 2 3 4 5 6 7 8 9 10 11 12 13 14 15 16 17 18 |
# Get the ID Token from the header (called "access_token" for some reason!) $access_token = $Request.Headers.'x-ms-token-aad-access-token' # I am interested in the body, so split it along dots... and the second part is the body (first is header, last is signature) $bodyBase64 = ($access_token -split '\.')[1] # Pad what I got above. Need this hack to workaround this error: # MethodInvocationException: Exception calling "FromBase64String" with "1" argument(s): "The input is not a valid Base-64 string as it contains a non-base 64 character, more than two padding characters, or an illegal character among the padding characters." switch ($bodyBase64.Length % 4) { 0 { break } 2 { $bodyBase64 += '==' } 3 { $bodyBase64 += '=' } } # Convert the Base64 to get JSON; then convert this JSON to as HashTable $claims = [System.Text.Encoding]::UTF8.GetString([System.Convert]::FromBase64String($bodyBase64)) | ConvertFrom-Json -Depth 10 $name = $claims.name |
I added this to the Function. The default PowerShell script in an Azure Function has the following block so this will pick up the $name variable and ideally print it to the requestor:
|
1 2 3 |
if ($name) { $body = "Hello, $name. This HTTP triggered function executed successfully." } |
And sure enough it does!

That’s cool, huh! 😎
This is why I am pretty pleased with myself. All these pieces are available but nothing worked out of the box and I had to stick with it to get it working. And the end product is cool coz now I can have Azure Functions authenticated against Azure AD and I can also identify the authenticated user’s name, email/ UPN, and Object ID. Now I can build on top of this as needed.