
I came across an interesting tool called sops from this article (a good read in itself about running a personal server/ self-hosting). It’s a tool created by Mozilla and stands for Secrets OPerationS. You can find the GitHub repo and documentation here. I haven’t used the tool so can’t talk much about it. It seems to be about encypting secrets in your YAML and JSON config files so you can add them to your Git repos. I haven’t had a use-case for it yet but I wanted to explore the tool coz who knows, maybe I’ll find a use for it.
Unfortunately they don’t have any ARM binaries so I figured why not complicate things a bit and make a Docker image out of it. :) This way I can publish it for all architectures using the buildx system and maybe it’s useful for others too. Also, it’s been a while since I built something in Docker and I wanted a gentle refresher for myself.
During this process I realized that yeah I had forgotten most of the stuff I setup some months ago so I should probably blog about it somewhere for next time. If I do something but don’t blog it, then have I really done it!? :)
Before we proceed further, if you stumbled upon this post to learn more about sops check out this one instead. That’s what I plan on reading to pick this up myself.
Building sops
Building sops is straight-forward according to the official docs as long as you have Go (v1.13 or later)(if not install it!):
|
1 2 3 4 |
$ go get -u go.mozilla.org/sops/v3/cmd/sops $ cd $GOPATH/src/go.mozilla.org/sops/ $ git checkout develop $ make install |
So the container image should be easy too.
There’s an official Go container too. They have Debian version but also offer Alpine as an experimental variant. I tried both actually and the final image based on Debian was about 700 MB while the one on Alpine was half that. I figured let’s go with Alpine for now.
Getting started with the Dockerfile
To build a Docker image we need a Dockerfile. This is the file where we detail the steps for building the image. In a way this is dead-simple – all you are really doing to build an image is tell Docker the steps to build it. You tell it hey go get the Golang image (for example), download such and such files or git repos, install any additional software such as git or make etc., and that’s it. Oh and if someone makes a container out of you I want you to execute such and such program as the default.
So that’s what I do below:
|
1 2 3 4 5 6 7 8 9 10 11 12 13 |
# == start with this image == FROM golang:1.15-alpine AS gobase ENV SOPS_VERSION 3.6.1 # I need make to compile stuff later on RUN apk add --update --no-cache make # Download the release; untar it; make it ADD https://github.com/mozilla/sops/archive/v3.6.1.tar.gz /go/src/app/ RUN tar xzf /go/src/app/v${SOPS_VERSION}.tar.gz -C /go/src/app/ WORKDIR /go/src/app/sops-${SOPS_VERSION} RUN make install |
This is only part of my Dockerfile actually. I am doing a multi-stage Docker build actually so in stage one I download the sops source code and build it; but then I discard all that in stage two and copy over just the built binaries. Why? Because I don’t need to carry around all the build dependencies… once sops is build I don’t care about them, so why keep them?
Each line of your Dockerfile is a layer and your Docker image is a combination of these layers. Each layer is read-only to the ones above it; and if they make any changes to any files in a lower layer that gets stored in their own layer.
Here’s a snippet of the build process for the block above. You can see each step happen and be added to a layer of its own. (I am rebuilding this image and most of the layers already exist, hence it says “cached”). If any layer were to change then all subsequent layers would be rebuilt.
|
1 2 3 4 5 6 7 8 9 10 11 12 13 14 15 16 17 18 19 20 21 22 23 24 |
$ docker build -t docker-sops . Sending build context to Docker daemon 124.4kB Step 1/14 : FROM golang:1.15-alpine AS gobase ---> 231f058156c2 Step 2/14 : ENV SOPS_VERSION 3.6.1 ---> Using cache ---> ba1f2958fa12 Step 3/14 : RUN apk add --update --no-cache make ---> Using cache ---> 381453b8e6ae Step 4/14 : ADD https://github.com/mozilla/sops/archive/v3.6.1.tar.gz /go/src/app/ Downloading 185.4kB ---> Using cache ---> 553e1ec65f3c Step 5/14 : RUN tar xzf /go/src/app/v${SOPS_VERSION}.tar.gz -C /go/src/app/ ---> Using cache ---> b492b48de0e6 Step 6/14 : WORKDIR /go/src/app/sops-${SOPS_VERSION} ---> Using cache ---> 67c51df7f418 Step 7/14 : RUN make install ---> Using cache ---> 9caedec424e1 |
With the snippet above I have downloaded a base image containing Go and based on Alpine. I installed make as that’s required for building sops, downloaded the sops release I am interested in (defined by a variable) to /go/src/app, extracted it, and built. The build process will download the required Go dependencies and finally install the build sops executable to /go/bin/sops.
Stage 2
In the next stage of the Dockerfile I start again with an alpine based Go image.
|
1 2 3 4 5 6 7 8 9 10 11 12 13 14 15 16 17 18 19 20 21 |
# == new base for the final image == FROM golang:1.15-alpine AS gofinal # Copy the binary we created above COPY --from=gobase /go/bin/sops /bin/sops # sops needs gnupg & I need nano RUN apk add --update --no-cache gnupg nano ENV EDITOR nano # The GPG_TTY env variable needs to be set for gpg to show the passphrase screen. # There's no way to pass that in the Dockerfile so I create an entrypoint script for that. # Thanks to https://stackoverflow.com/a/49889134 COPY ./entrypoint.sh /bin/entrypoint.sh # Set a working directory (We can mount the user's $(pwd) here later on) WORKDIR /home # Set this as the entry point for the image ENTRYPOINT ["/bin/entrypoint.sh"] |
I then copy the built binary from /go/bin/sops to /bin/sops. I also install GnuPG as we need it for key management and nano as I am one of those people who use nano instead of Vi or Emacs. I also set an environment variable setting the EDITOR for the image to be nano.
At this point initially I had a statement like the following:
|
1 2 |
WORKDIR /home ENTRYPOINT ["/bin/sops"] |
This sets the default directory of the image to be /home (default because that’s the last WORKDIR statement) and I say a container based on this image should run /bin/sops as default. So running this container is same as running /bin/sops and whatever arguments I pass to the container would be passed to /bin/sops – which is nice, effectively we are encapsulating the entire container as a program; for some reason I like that thought.
However, that approach had a drawback in that when sops invokves gpg to decrypt files, and gpg shows a window to ask for the passphrase it fails. That’s because gpg needs a variable set for the TTY. It needs the following set:
|
1 |
GPG_TTY=$(tty) |
There’s no way to set this in the Dockerfile to set the variable to the output of the tty command at runtime so I cheated a bit and made a shell file instead that sets the variable and runs /bin/sops:
|
1 2 3 |
#!/bin/sh GPG_TTY=$(tty) /bin/sops $@ |
Call this entrypoint.sh. It runs /bin/sops with the variable set, and passes any arguments given to the shell script to it. Simple stuff. And thus in my final Dockerfile I simple copy over this entrypoint.sh file to the image and set that as the entrypoint:
|
1 2 3 4 5 6 7 |
COPY ./entrypoint.sh /bin/entrypoint.sh # Set a working directory (We can mount the user's $(pwd) here later on) WORKDIR /home # Set this as the entry point for the image ENTRYPOINT ["/bin/entrypoint.sh"] |
To give credit where it’s due, I got the idea of this shell script from a StackOverflow answer.
Running the container
Building the image is only part story though. But let’s get that out of the way. At this point I can run the following command in whichever directory I have the Dockerfile and entrypoint.sh file in and it will build the image for me. This does not push anything to DockerHub.
|
1 |
docker build -t docker-sops . |
This builds an image called docker-sops.
I then run it thus:
|
1 2 3 4 5 |
docker run -it --rm \ --name docker-sops \ -v $(pwd):/home \ -v $HOME/.gnupg:/root/.gnupg \ docker-sops |
Let me explain what this does:
runthe container, attach it a pseudo terminal (-t) and STDIN (-i)- call it docker-sops (
--name docker-sops) – the name doesn’t really matter -rmsays delete this container as soon as its done (hence why I said the name doesn’t matter as I’ll be binning it rightaway; so the naming is more of OCD on my part of naming things :))-v $(pwd):/hometells the container to map my current working directory to/homeinside the container. Thus the container can access whatever directory I am in currently – so that sops can do its work.-v $HOME/.gnupg:/root/.gnupgmaps the.gnupgdirectory in my home directory to/root/.gnupginside the container so when sops invokesgpginside the container it has access to my GnuPG keys as they are mapped to its home dir (gpgruns as root inside the container).- the final line
docker-sopshas the name of the image (docker-sops) which will change later on to be the proper name on DockerHub but for now this will do as I am pulling from the image I built earlier.
To the above command I could pass any sops commands and it will be as if they are passed to sops in the container. So what I did was create a function that captures the above command:
|
1 2 3 4 5 6 7 |
function docker-sops { docker run -it --rm \ --name docker-sops \ -v $(pwd):/home \ -v $HOME/.gnupg:/root/.gnupg \ docker-sops $@ ; } |
The function’s similar to the command above just that I pass it $@ to say that any inputs passed to the function must be added to the docker run command line so they get passed on to sops inside the container.
Thus I could just type docker-sops somefile.json. Of course I could have named the function sops and then I could have just type sops somefile.json and none would be the wiser!
Multi-arch build
What I built above was a single arch build – for arm64 in my case. If I want to do a multi-arch build I have to setup the buildx environment and then I can do it:
|
1 |
docker buildx build --platform linux/amd64,linux/arm64,linux/386,linux/arm/v7,linux/arm/v6 --output "type=image,push=false" . --tag docker-sops |
I tend to use a script to do this and also push to DockerHub. If you look at my GitHub repo there’s a buildandpush.sh script which does this for me.
|
1 2 3 4 5 6 7 8 9 10 11 12 |
#!/bin/bash # Usage ./buildandpush.sh BUILDINFO="$(pwd)/buildinfo.json" if ! [[ -r "$BUILDINFO" ]]; then echo "Cannot find $BUILDINFO file. Exiting ..."; exit 1; fi if ! command -v jq &> /dev/null; then echo "Cannot find jq. Exiting ..."; exit 1; fi VERSION=$(jq -r '.version' $BUILDINFO) IMAGENAME=$(jq -r '.imagename' $BUILDINFO) docker buildx build --platform linux/amd64,linux/arm64,linux/386,linux/arm/v7,linux/arm/v6 . --push -t ${IMAGENAME}:${VERSION} --progress=plain |
It’s something simple I wrote and all it does is take some info from a JSON file (so I don’t have to keep changing this script or passing them as input) that specifies the name of the image and a version number. It then builds the image for all architectures and also pushes it (notice the --push switch). Note: This expects me to have already logged in to DockerHub via the docker login command.
Here’s how the buildinfo.json file looks for the sops image:
|
1 2 3 4 |
{ "imagename": "rakheshster/sops", "version": "3.6.1-2" } |
Again, nothing fancy. All the script does is read this file via the jq command and run the docker buildx command.
GitHub Actions
Since my code is hosted in GitHub I can take advantage of something free called GitHub Actions to do the above process of building and pushing the container to DockerHub. That way all I need to do is publish to GitHub and click a button to build the image and push. It’s convenient.
I don’t want to go into how GitHub Actions are created but it’s pretty straighforward. You can choose from their existing Actions or create a new one – which basically makes a YAML file for you:
|
1 2 3 4 5 6 7 8 9 10 11 12 13 14 15 16 17 18 19 20 21 |
# This is a basic workflow to help you get started with Actions name: CI # Controls when the action will run. on: # Triggers the workflow on push or pull request events but only for the master branch push: branches: [ master ] pull_request: branches: [ master ] # Allows you to run this workflow manually from the Actions tab workflow_dispatch: # A workflow run is made up of one or more jobs that can run sequentially or in parallel jobs: # This workflow contains a single job called "build" build: # The type of runner that the job will run on runs-on: ubuntu-latest |
The above is a snippet of that default one but it gives you an idea. You name it, define some triggers as to when it runs, then defines some jobs/ tasks to do. That’s it.
You can find my Workflow in the repo (all Actions are stored in a .github folder inside the repo and can be managed with any code editored and version like the rest of your code – neat!). Here’s mine:
|
1 2 3 4 5 6 7 8 9 10 11 12 13 14 15 16 17 18 19 20 21 22 23 24 25 26 27 28 29 30 31 32 33 34 35 36 37 38 39 40 41 42 43 44 45 46 47 48 49 50 51 52 53 54 55 56 57 58 59 60 61 62 63 64 65 66 67 68 69 70 71 72 73 74 75 76 |
# This is the name of the workflow name: Buildx & Push to DockerHub # When it runs on: workflow_dispatch: # And what jobs it has jobs: # Just one job here ... imaginatively called "buildx" (that's its id at least, it doesn't have a name coz I couldn't think of something) buildx: # this job runs on Ubuntu runs-on: ubuntu-latest # these are its environment variables env: # If I were using the workflow_dispatch inputs above, I can reference them as variables here # Variable format for workflow_dipatch https://github.blog/changelog/2020-07-06-github-actions-manual-triggers-with-workflow_dispatch/ # IMAGENAME: ${{ github.event.inputs.imagename }} # VERSION: ${{ github.event.inputs.version }} PLATFORMS: "linux/amd64,linux/arm64,linux/386,linux/arm/v7,linux/arm/v6" # the steps of my job steps: # Checkout the code from GitHib - name: Checkout the code uses: actions/checkout@v2 # Read my JSON file via a simple cat, then output it as the output of this step (which I can then refer to via its id "read_buildinfo") - id: read_buildinfo run: | content=`cat ./buildinfo.json` # the following lines are required for multi line json content="${content//'%'/'%25'}" content="${content//$'\n'/'%0A'}" content="${content//$'\r'/'%0D'}" # end of optional handling for multi line json echo "::set-output name=packageJson::$content" # Set up QEMU (https://github.com/docker/setup-qemu-action) # (this allows buildx to build for other platforms) - name: Set up QEMU uses: docker/setup-qemu-action@v1 - name: Set up Docker Buildx id: buildx uses: docker/setup-buildx-action@v1 - name: Docker Buildx (build the image) run: | IMAGENAME="${{ fromJson(steps.read_buildinfo.outputs.packageJson).imagename }}" VERSION="${{ fromJson(steps.read_buildinfo.outputs.packageJson).version }}" docker buildx build --platform $PLATFORMS --output "type=image,push=false" . --tag ${IMAGENAME}:${VERSION} --tag ${IMAGENAME}:latest - name: Login to Docker Hub if: success() && github.event_name != 'pull_request' uses: docker/login-action@v1 with: username: ${{ secrets.DOCKER_USERNAME }} password: ${{ secrets.DOCKER_PASSWORD }} - name: Docker Buildx (push the image) if: success() && github.event_name != 'pull_request' run: | IMAGENAME="${{ fromJson(steps.read_buildinfo.outputs.packageJson).imagename }}" VERSION="${{ fromJson(steps.read_buildinfo.outputs.packageJson).version }}" docker buildx build --platform $PLATFORMS --output "type=image,push=true" . --tag ${IMAGENAME}:${VERSION} --tag ${IMAGENAME}:latest - name: Inspect image if: always() && github.event_name != 'pull_request' run: | IMAGENAME="${{ fromJson(steps.read_buildinfo.outputs.packageJson).imagename }}" VERSION="${{ fromJson(steps.read_buildinfo.outputs.packageJson).version }}" docker buildx imagetools inspect ${IMAGENAME}:${VERSION} |
It’s commented so should mostly make sense.
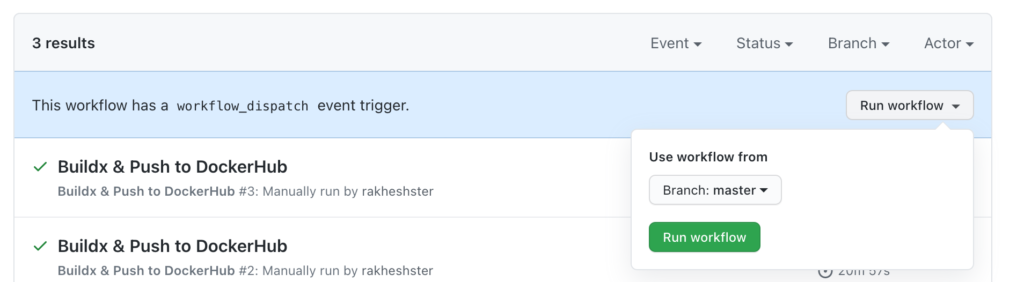
I chose to go with a manual approach so my Action only runs when I trigger it. Hence this bit on the top:
|
1 2 3 |
# When it runs on: workflow_dispatch: |
So – only run when I am dispatching it. Which is a different way of saying I press the button, I suppose.
The steps run on an Ubuntu VM coz I define it so:
|
1 2 3 4 5 6 7 |
# And what jobs it has jobs: # Just one job here ... imaginatively called "buildx" (that's its id at least, it doesn't have a name coz I couldn't think of something) buildx: # this job runs on Ubuntu runs-on: ubuntu-latest # these are its environment variables |
If you want Linux then Ubuntu is your only option I think.
I define my platforms as a variable so I can tweak them easily later if required:
|
1 |
PLATFORMS: "linux/amd64,linux/arm64,linux/386,linux/arm/v7,linux/arm/v6" |
And then I have various steps like checkout the code, and read the buildinfo.json file so I can define my image name etc. there and use it with GitHub actions too:
|
1 2 3 4 5 6 7 8 9 10 11 12 13 14 15 |
steps: # Checkout the code from GitHib - name: Checkout the code uses: actions/checkout@v2 # Read my JSON file via a simple cat, then output it as the output of this step (which I can then refer to via its id "read_buildinfo") - id: read_buildinfo run: | content=`cat ./buildinfo.json` # the following lines are required for multi line json content="${content//'%'/'%25'}" content="${content//$'\n'/'%0A'}" content="${content//$'\r'/'%0D'}" # end of optional handling for multi line json echo "::set-output name=packageJson::$content" |
The code looks a bit complicated because you need some of that stuff to handle JSON. I found it via StackOverflow when my initial attempts failed. All I am really doing is reading that file into a variable: content=; and then converting that JSON into separate variables: cat ./buildinfo.jsonecho "::set-output name=packageJson::$content".
I can then store those variables and refer to them later. I do that in this step:
|
1 2 3 4 |
- name: Docker Buildx (build) run: | IMAGENAME="${{ fromJson(steps.read_buildinfo.outputs.packageJson).imagename }}" VERSION="${{ fromJson(steps.read_buildinfo.outputs.packageJson).version }}" |
What I am doing is set a variable IMAGENAME in the Action that refers to ${{ fromJson(steps.read_buildinfo.outputs.packageJson).imagename }} – i.e. the imagename key in the JSON file I previous read. I do the same for the VERSION variable.
The rest is based on a helpful GitHub Action for Buildx built by crazy-maxx (Kevin Alvarez). He seems to be a very active and varied developer as he’s got his hands in a lot of things. :) This Buildx action of his is now taken over by Docker itself. I’ll quickly go over what I am doing here.
First up I setup QEMU and Buildx in the Ubuntu VM we are running on:
|
1 2 3 4 5 6 |
- name: Set up QEMU uses: docker/setup-qemu-action@v1 - name: Set up Docker Buildx id: buildx uses: docker/setup-buildx-action@v1 |
And then I go through steps like building the image, and if it succeeds then login to DockerHub and push it.
|
1 2 3 4 5 6 7 8 9 10 11 12 13 14 15 16 17 18 19 20 21 22 23 24 25 26 27 28 29 30 |
- name: Docker Buildx (build the image) run: | IMAGENAME="${{ fromJson(steps.read_buildinfo.outputs.packageJson).imagename }}" VERSION="${{ fromJson(steps.read_buildinfo.outputs.packageJson).version }}" docker buildx build --platform $PLATFORMS --output "type=image,push=false" . --tag ${IMAGENAME}:${VERSION} --tag ${IMAGENAME}:latest - name: Login to Docker Hub if: success() && github.event_name != 'pull_request' # uses: crazy-max/ghaction-docker-login@v1 (not used any more as the action name has changed to the below) uses: docker/login-action@v1 with: username: ${{ secrets.DOCKER_USERNAME }} password: ${{ secrets.DOCKER_PASSWORD }} - name: Docker Buildx (push the image) if: success() && github.event_name != 'pull_request' run: | IMAGENAME="${{ fromJson(steps.read_buildinfo.outputs.packageJson).imagename }}" VERSION="${{ fromJson(steps.read_buildinfo.outputs.packageJson).version }}" docker buildx build --platform $PLATFORMS --output "type=image,push=true" . --tag ${IMAGENAME}:${VERSION} --tag ${IMAGENAME}:latest - name: Inspect image if: always() && github.event_name != 'pull_request' run: | IMAGENAME="${{ fromJson(steps.read_buildinfo.outputs.packageJson).imagename }}" VERSION="${{ fromJson(steps.read_buildinfo.outputs.packageJson).version }}" docker buildx imagetools inspect ${IMAGENAME}:${VERSION} |
There are actions to build & push but I didn’t go that route as when I had first set this up this action wasn’t available. I’ll probably update this at some point. When building and pushing I tag it with the version number and also latest so the latter will always point to the latest version.
That’s all!
And that’s it. I now have the image pushed to DockerHub and it can be pulled via docker pull rakheshster/sops:latest. I updated my previous function as below and added to my .bash_profile:
|
1 2 3 4 5 6 7 |
function docker-sops { docker run -it --rm \ --name docker-sops \ -v $(pwd):/home \ -v $HOME/.gnupg:/root/.gnupg \ rakheshster/sops:latest $@ ; } |
Now I can do docker-sops <whatever> as I mentioned earlier. :) Time to actually start using sops by reading through this blog post and the official docs.