
So I have an OpenBSD.amsterdam VM as I might have mentioned in the past. It’s a great place to get a VM at if you want something OpenBSD. I don’t use it much except for hosting Gitea currently, so some days ago I thought let me use it for IPv6. I am on Virgin Media here in the UK and they don’t provide IPv6 yet (crazy!).
My previous ISP in Dubai (Etisalat) had it so I am familiar with IPv6 and have set it up at home… but it’s been a while and I have forgotten most of it. Good thing about blogging all this though is that I can read my own blog post on it and come up to speed kind of. :)
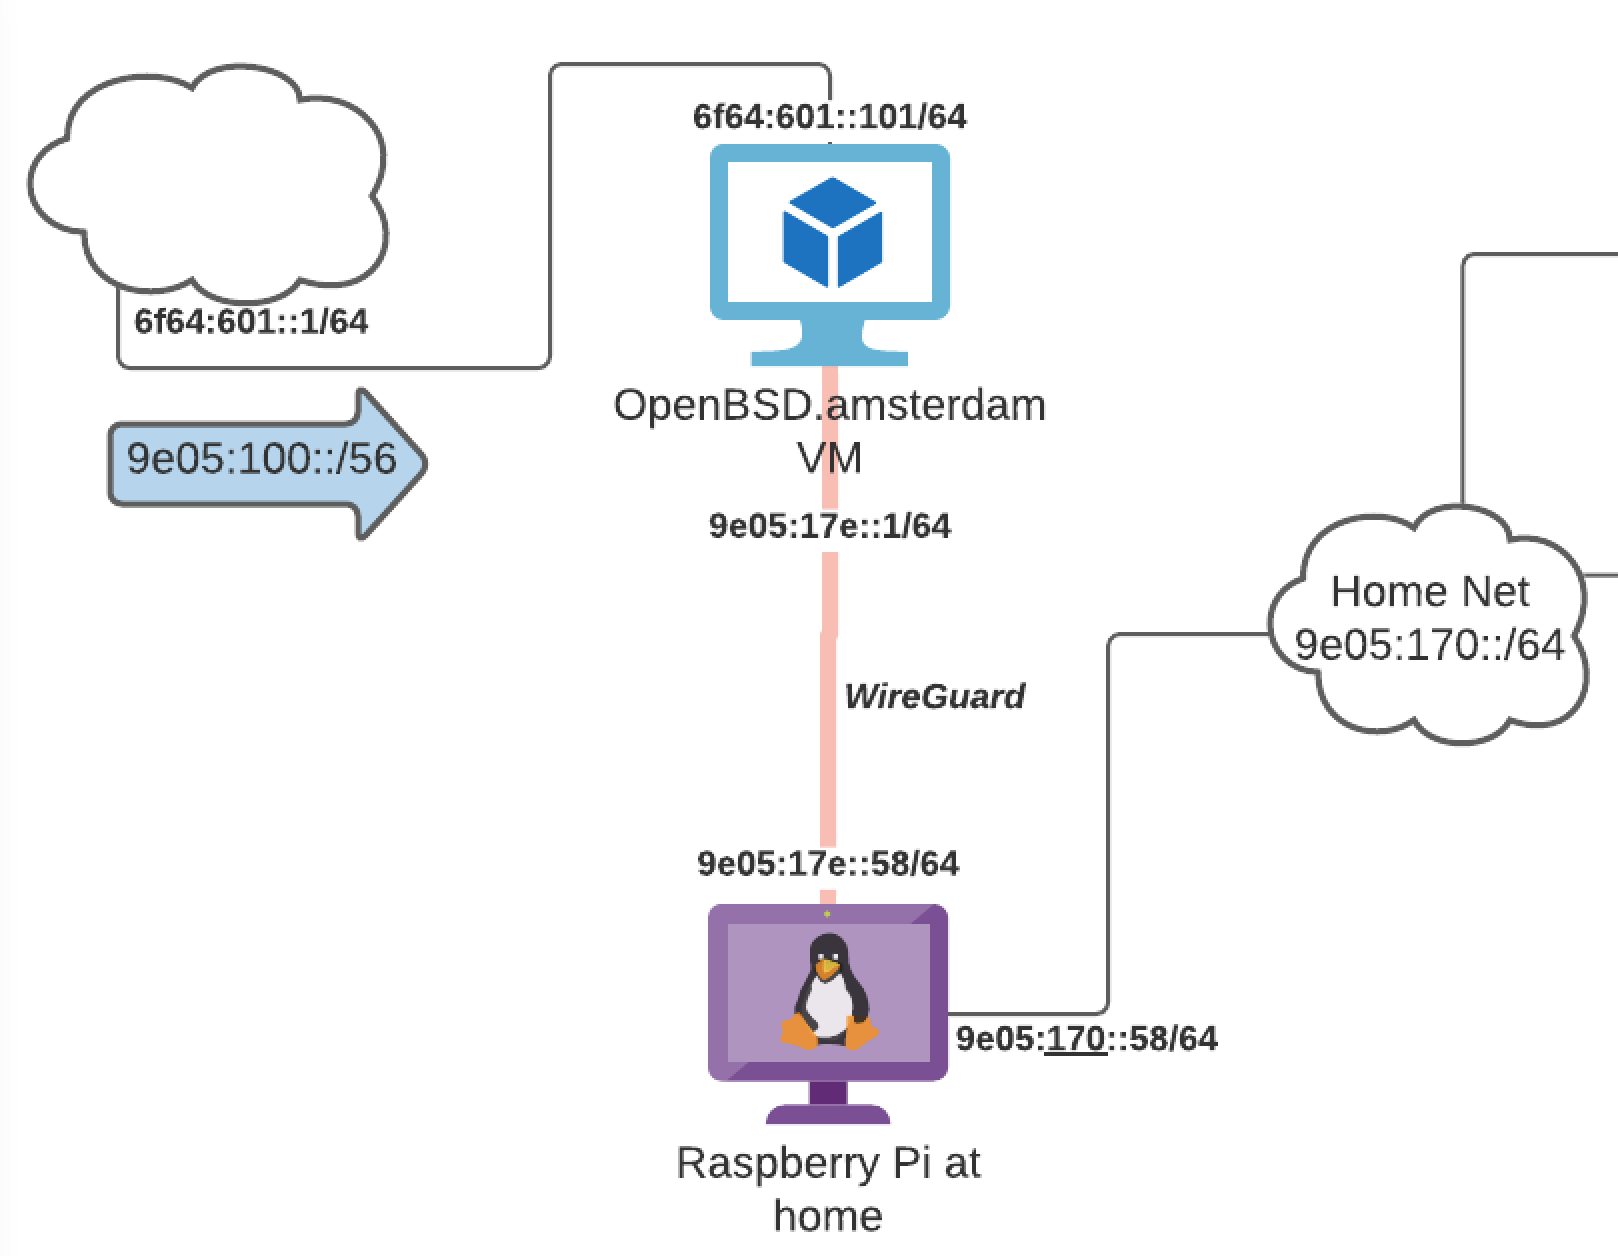
Thing is OpenBSD.amsterdam, like most VPS providers, just give you a /64 IPv6 address. An IPv6 /64 address sounds cool on paper coz it’s as though you are getting 18,446,744,073,709,551,616 addresses to use – which mind you, you are – but the catch is that it’s all in one network. Unlike with IPv4 wherein if you are given a /24 network address for instance you can subnet it further and have more networks with a smaller number hosts, with IPv6 the idea is to not subnet it further. IPv6 addresses are 128 bits and the intention is you use 64 bits for network and 64 bits for host – it’s fixed, leave it at that, and don’t try and subnet into those 64 host bits as we are trying to avoid all that messiness of IPv4. Of course some people still do subnet a /64 IPv6 address they are given but it tends to break some things and you have to work around these limitations (which is fine too I suppose if you are into that). I didn’t want to spend too much time getting into the intricacies of IPv6 so I asked mischa@ of OpenBSD.amsterdam if there was any way of getting a larger space than the /64 I had been given. He was super accomodating and assigned me a new /56 network pointing to my OpenBSD.amsterdam machine. Yay to that! :)
So my OpenBSD machine has an IPv6 address of 2a03:6000:6f64:601::101/64 and its gateway is currently 2a03:6000:6f64:601::1. He has routed 2a03:6000:9e05:100::/56 to me.
If you want to do IPv6 subnetting I recommend this website. Pop in your network, tell it how you want to subnet, and it spits out the new prefixes. A word to the wise though, with IPv6 the recommendation is to create subnets along nibble boundaries (lovely word – “nibble” – makes me think of chocolate).
What’s a nibble, you ask? A nibble’s 4 bits. An IPv6 address has 128 bits. An IPv4 address has 32 bits. In IPv4 you put those 32 bits into 4 groups of 8 bits each – i.e. <8 bits>.<8 bits>.<8 bits>.<8 bits>. In IPv6 you put those 128 bits into 8 groups of 16 bits each (double the number of groups and bits basically) – i.e. <16 bits>:<16bits>:...(keep doing for a total of 8 groups). Let’s take one of those groups. It has 16 bits, or 4 groups of 4 bits (nibble!!). So the 16 bits can be represented as NNNN (where each N is a nibble – i.e. 4 bits). Since a nibble has 4 bits, and each bit can be a 0 or 1 (i.e. each bit can be one of 2 things, a 0 or a 1), what you are saying is that a nibble can be 2 things x 2 things x 2 things x 2 things or rather a nibble can be one of 16 things. Or to put it in hexadecimal form (which is what IPv6 addresses use) a nibble can be anything from 0-9 or a-f. Going back to you 128 bit IPv6 address thus, a nibble is basically each character in that IPv6 address… and by subnetting along nibble boundaries what you are saying is try and subnet in such a way that the character itself is not broken down into some “monstrosity” (sorry that’s me being dramatic!) rather try and subnet in such a way that the subnet starts between characters.
To give an example take my subnet 2a03:6000:9e05:100::/56. I could subnet this into a /57 – which gives me two subnets:
- 2a03:6000:9e05:100::/57
- 2a03:6000:9e05:180::/57
Nothing wrong with that but it’s kind of not pretty because the 100 you see is actually 0100 and by not subnetting along a nibble boundary I am breaking the 3rd character from the left (a 0) leaving me with a 100 and 180… nothing wrong with that, just that tomorrow if I see an address like say 2a03:6000:9e05:170:1/57 I have to resort to a subnet calculator or something to figure out which network that address is in (the subnet calculator would show me the two networks above and tell me that this address is in the first network).
In contrast if I subnet along a nibble boundary – easy way to remember this is to subnet along multiples of 4, so you know /16, /20, /24, … /56, /60, /64 – so in this case I subnet the /56 as a /60 here are my networks:
- 2a03:6000:9e05:100::/60
- 2a03:6000:9e05:110::/60
- 2a03:6000:9e05:120::/60
- 2a03:6000:9e05:130::/60
- 2a03:6000:9e05:140::/60
- 2a03:6000:9e05:150::/60
- 2a03:6000:9e05:160::/60
- 2a03:6000:9e05:170::/60
- 2a03:6000:9e05:180::/60
- 2a03:6000:9e05:190::/60
- 2a03:6000:9e05:1a0::/60
- 2a03:6000:9e05:1b0::/60
- 2a03:6000:9e05:1c0::/60
- 2a03:6000:9e05:1d0::/60
- 2a03:6000:9e05:1e0::/60
- 2a03:6000:9e05:1f0::/60
Prettier, won’t you say? I now know an address in the 100 range is the first network, in the 110 range is the second network, and so on … Makes it so much so easier to read an IPv6 address which kind of is a point with IPv6 addresses. They look complicated but they are supposed to be easier to work with if you follow these rules like networks are /64 or less (as in don’t subnet a /64 network, the smallest network you should have is a /64 even though that’s a bucket load of IPv6 host addresses that you are never going to use and hence seems wasteful) and try and subnet along nibble boundaries (/64, /60, /56, /52, etc.)
That’s enough IPv6 intro I guess. :) In my case I decided to subnet the /56 I was given into /64 subnets. That gives me 256 subnets of 1 /64 network each, of which I just need two for now. What do I need 2 for? One is for the two endpoints of the WireGuard tunnel I’ll have from a Raspberry Pi at home to the OpenBSD.amsterdam VM (yes, a /64 subnet of 18,446,744,073,709,551,616 addresses IPv6 host addresses of which we’ll only be using 2 – get used to it). The other subnet will be what I advertise at home for my devices. (I could add more subnets at home later, of course; for now I’ll start with one). All devices at home will get an IPv6 address from this subnet via DHCPv6, with the Raspberry Pi being set as the default IPv6 gateway which will in turn send this traffic across WireGuard to OpenBSD.amsterdam.
Let’s get to it.
OpenBSD
Let’s start with enabling IPv6 forwarding on IPv6. Add this to /etc/sysctl.conf:
|
1 2 |
# ipv6 forwarding net.inet6.ip6.forwarding=1 |
And set it manually for now:
|
1 |
doas sysctl net.inet6.ip6.forwarding=1 |
OpenBSD.amsterdam doesn’t pick up the IPv6 you are assigned automatically so you need to assign it manually. Here’s my /etc/hostname.vio0.
|
1 2 3 4 5 6 7 8 9 10 11 |
# used for IPv4 only dhcp # manually assign IPv6 address inet6 2a03:6000:6f64:601::101/64 # set default IPv6 route !route add -inet6 default 2a03:6000:6f64:601::1 # autoconf doesn't work so I comment out the below # inet6 autoconf |
I didn’t add anything from the new range here. That’s on the WireGuard side.
If you have the PF firewall enabled it would be good to add some rules for IPv6 in case you are blocking things by default (I am). I found this blog post to be a handy reference. Here’s a snippet of my /etc/pf.conf for IPv6:
|
1 2 3 4 5 6 7 8 9 10 11 12 13 14 15 16 17 18 19 20 21 22 23 24 25 26 27 28 29 30 31 32 33 34 35 36 37 38 39 40 41 42 43 44 45 |
# ----------------- # # Macros # # ----------------- # wg_if = "wg0" wireguard_port = "3000" # defining some IPv6 types as macros icmp6_types_allow1 = "{ 2, 128 }" # packet too big; these are allowed only to my egress later icmp6_ping = "{ 128 }" # echo request (ping6); I may or may not block this later icmp6_types_allow2 = "{ 133, 134, 135, 136, 137 }" # these are allowed to egress and ff02::1/16 (multicast; all nodes in this network) later # Neighbor Discovery Protocol (NDP) (types 133-137): # Router Solicitation (RS), Router Advertisement (RA) # Neighbor Solicitation (NS), Neighbor Advertisement (NA) # Route Redirection # ----------------- # # Filtering # # ----------------- # # Start with a default deny # NOTE: no "quick" here so the packet actually goes through and any later rule can pass it; else it gets blocked as that's the default. # 1/2 Block all incoming block in log all # 2/2 Block all outgoing but also log it block out log all # Allow all incoming traffic on the WireGuard tunnel pass in quick on $wg_if # Allow all outgoing traffic on the WireGuard tunnel # I will change this later. Just keeping it simple initially. pass out quick on $wg_if # -- WIREGUARD -- pass in quick on egress proto udp from any to egress port $wireguard_port pass in quick on egress proto tcp from any to egress port $wireguard_port # -- IPV6 -- pass in quick on egress inet6 proto ipv6-icmp icmp6-type $icmp6_types_allow1 keep state pass in quick on egress inet6 proto ipv6-icmp from any to { egress, ff02::1/16 } icmp6-type $icmp6_types_allow2 keep state pass in quick on egress inet6 proto udp from any to any port $incoming_udp6_ports keep state # Block only the ICMPv6 types I want to block (ping6 basically) # block drop in quick on $ext_if inet6 proto ipv6-icmp icmp6-type $icmp6_ping |
As you see I also added some exceptions for WireGuard. Also, check this site out for a list of the other IPv6 types.
Now onto WireGuard. Most of the WireGuard steps on OpenBSD were previously covered in another blog post but I’ll repeat them here for completeness. That one didn’t do any forwarding nor IPv6 so things are slightly different.
|
1 2 3 4 5 6 7 8 9 10 11 12 |
# Create a private key openssl rand -base64 32 > $HOME/wg0.key # Create the WireGuard tunnel interface # This listens on port 3000, feel free to change doas ifconfig wg0 create wgport 3000 wgkey `cat $HOME/wg0.key` # Confirm the interface is created, and note the public key doas ifconfig wg0 # Destroy the interface doas ifconfig wg0 destroy |
Note that before destroying the interface I take note of the public key. That’s the only reason I created this interface. Once I have the public key I destroy it as I’ll put all this into a file so it’s saved for the future. For that create a file called /etc/hostname.wg0 with the following contents:
|
1 2 3 4 5 6 |
wgkey <put the private key from $HOME/wg0.key> wgport 3000 # the IPv6 address of the tunnel on OpenBSD side # this is from one of the /64 subnets I created inet6 2a03:6000:9e05:17e::1/64 |
That’s all on the OpenBSD side for now.
Raspberry Pi (Linux)
Again, start with enabling IPv6 forwarding on IPv6. In /etc/sysctl.conf:
|
1 2 3 4 |
# Uncomment the next line to enable packet forwarding for IPv6 # Enabling this option disables Stateless Address Autoconfiguration # based on Router Advertisements for this host net.ipv6.conf.all.forwarding=1 |
Do this to the running instance too so we don’t need to reboot:
|
1 |
sudo sysctl -p |
Bit different here as we have the wg commands:
|
1 2 3 4 5 |
# generate a private key wg genkey > $HOME/wg0.key # generate the public key wg pubkey < $HOME/wg0.key |
Let’s create the WireGuard config file now. Do sudo nano -w /etc/wireguard/wg0.conf (or whatever editor you prefer):
|
1 2 3 4 5 6 7 8 9 10 11 12 13 |
[Interface] # this is from one of the /64 subnets I created Address = 2a03:6000:9e05:17e::58/64 ListenPort = 45086 PrivateKey = <insert the private key from $HOME/wg.key> PostUp = ip6tables -A FORWARD -i %i -j ACCEPT; iptables -A FORWARD -o %i -j ACCEPT PostDown = ip6tables -D FORWARD -i %i -j ACCEPT; iptables -D FORWARD -o %i -j ACCEPT [Peer] PublicKey = <insert the public key from OpenBSD> AllowedIPs = ::/0 Endpoint = <ipv4 address of my openbsd vm>:<wireguard port> PersistentKeepalive = 25 |
Standard config, just that it’s IPv6 only. I assign a private key to the WireGuard interface on Linux, add some firewall rules to allow forwarding (as this device will be the IPv6 gateway for other devices on my network), and add my OpenBSD end as a peer. Moreover I set its AllowedIPs to ::/0 so this because the default IPv6 gateway of the Pi itself.
Back to OpenBSD
All I need to do here is modify /etc/hostname.wg0 with the Pi as its peer. Here’s the file in its entirety with the additional line:
|
1 2 3 4 5 6 7 8 9 10 11 12 |
wgkey <put the private key from $HOME/wg0.key> wgport 3000 # this is Raspberry Pi at home wgpeer <public key from the Pi> wgaip 2a03:6000:9e05:17e::58/64 wgaip 2a03:6000:9e05:170::58/64 # the IPv6 address of the tunnel on OpenBSD side # this is from one of the /64 subnets I created inet6 2a03:6000:9e05:17e::1/64 # add a route to my home network pointing to the WireGuard IP of the Pi !route add -net 2a03:6000:9e05:170::/64 2a03:6000:9e05:17e::58 |
I allow traffic from the two IPv6 subnets and also add a routing table entry for the subnet at home to go via the Pi.
That’s it.
On OpenBSD I now do doas sh /etc/netstart wg0 to bring up the interface. On Linux I do sudo wg-quick up wg0. That should bring up the two endpoints of the tunnel the Raspberry Pi should be able to talk to the IPv6 Internet via OpenBSD.amsterdam.
I assigned an IPv6 address to the Pi on the “home” side via /etc/network/interfaces:
|
1 2 |
iface eth0 inet6 static address 2a03:6000:9e05:170::58/64 |
If I manually assign an IPv6 address to other devices on my network and point them to the Pi as the default gateway for IPv6 they too will have IPv6 Internet access:
|
1 2 3 |
iface eth0 inet6 static address 2a03:6000:9e05:170::60/64 gateway 2a03:6000:9e05:170::58 |
Next Steps
After confirming this works I’ve disabled this for now. This is because I want to tweak my OpenBSD side firewalls a bit. Currently I have some rules that allow access to SSH for instance. They are not limited to IPv4 only and once I enable IPv6 routing to home this will mean anyone can SSH to my home network too as all these machines are now public. And that’s something to keep in mind about IPv6. We are so used to having a home network being behind a NAT and so kind of firewalled; but with IPv6 everything’s in public again like how the Internet was supposed to be, so you have to take security a bit more seriously. No biggie, I’ll just have to change the firewall rules to be IPv4 only for a start and specifically allow only to certain IPv6 ports/ IPs at home.
I also need to setup my DHCP server at home to dole out IPv6 addresses.
Exciting stuff though, I now have an IPv6 only VPN! :)