
Windows RE
Windows RE (Recovery Environment) is a recovery environment that you boot into when your Windows installation is broken. When the Windows boot loader realizes your Windows installation is broken it will automatically boot into Windows RE. (During boot up the Windows boot loader sets a flag indicating the boot process has started. When the OS loads it clears this flag. If the OS doesn’t load and the computer reboots, the boot loader sees the already set flag and knows there’s a problem. A side effect of this is a scenarios where where the OS starts to load but the machine loses power and so the flag isn’t cleared; later when power returns and the machine is turned on the boot loader notices the flag and loads Windows RE as it thinks the OS is broken).
Screenshots
You can manually boot into Windows RE by pressing F8 and selecting “Repair your computer” from the options menu.
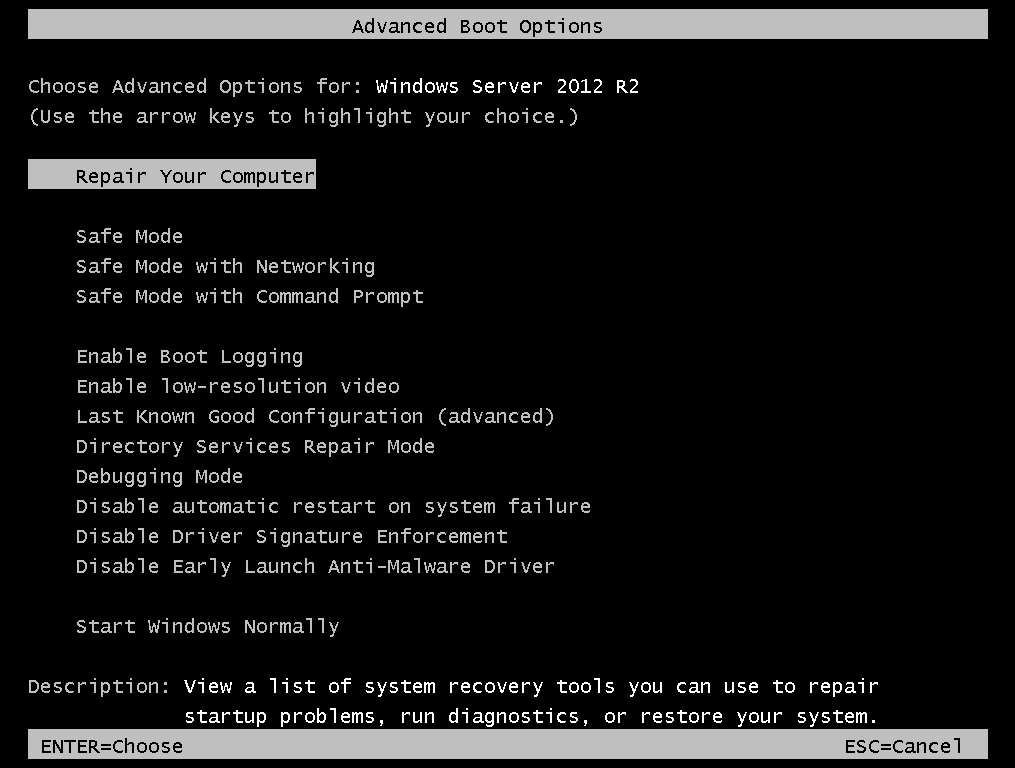
The Windows RE menu.

Apart from continuing the boot process into the installed OS, you can also power off the computer, boot into a USB driver or network connection, or do further troubleshooting. The above screenshot is from a Windows Server 2012 install. Windows 8 has a similar UI, but Windows 7 (and Windows Server 2008 and Windows Vista) have a different UI (but with similar functionality).
Selecting “Troubleshoot” shows the following “Advanced options”:

The startup settings can be changed here or a command prompt windows launched for further troubleshooting.

It is also possible to re-image the computer from a recovery image. The recovery image can be on a DVD, an external hard drive, or a Recovery Image partition. It is also possible to store your own recovery image to this partition

Location of Windows RE
Windows RE itself is based on Windows PE and is stored as a WIM file. This means you can customize Windows RE by adding additional languages, tools, and drivers. You can even add one custom tool to the “Troubleshoot” menu. On BIOS systems the Windows RE WIM file is stored in the (hidden) system partition. On UEFI systems it is stored in the Windows RE tools partition.
The system partition/ Windows RE tools partition has a folder \Recovery\WindowsRE that contains the WIM file winre.wim and a configuration file ReAgent.xml. On the installed system the \Windows\System32\Recovery\ folder has a ReAgent.xml which is a copy of the file in the system tools/ Windows RE tools partition. The former must be present and have correct entries. Also, for BIOS systems, the system partition must be set as active (and it has an MBR ID of 27 which marks it as a system partition).
|
1 2 3 4 5 6 7 8 9 10 11 12 13 14 15 16 17 18 19 20 21 22 23 24 25 26 27 28 29 30 31 32 33 34 35 36 37 38 39 40 41 42 43 44 |
PS C:\WINDOWS\system32> Get-Partition Disk Number: 0 PartitionNumber DriveLetter Offset Size Type --------------- ----------- ------ ---- ---- 1 1048576 350 MB Unknown 2 C 368050176 111.45 GB IFS PS C:\WINDOWS\system32> Add-PartitionAccessPath -DiskNumber 0 -PartitionNumber 1 -AccessPath T: PS C:\WINDOWS\system32> t: PS T:\> Get-ChildItem -Force Directory: T:\ Mode LastWriteTime Length Name ---- ------------- ------ ---- d--hs 08/11/2014 10:49 $RECYCLE.BIN d--hs 05/11/2014 14:51 Boot d--hs 04/12/2013 07:10 Recovery d--hs 08/11/2014 10:59 System Volume Information -arhs 14/06/2014 14:46 404250 bootmgr -a-hs 18/06/2013 16:18 1 BOOTNXT -arhs 03/12/2013 19:05 8192 BOOTSECT.BAK PS T:\> cd .\Recovery PS T:\Recovery\WindowsRE> Get-ChildItem -Force Directory: T:\Recovery\WindowsRE Mode LastWriteTime Length Name ---- ------------- ------ ---- ---hs 18/06/2013 19:08 3170304 boot.sdi ---hs 03/12/2013 19:16 1022 ReAgent.xml -a-hs 03/12/2013 19:12 287303082 Winre.wim PS T:\Recovery\WindowsRE> Get-Content .\ReAgent.xml |
|
1 2 3 4 5 6 7 8 9 10 11 12 13 14 15 16 17 18 |
<WindowsRE version="2.0"> <WinreBCD id="{91d1f9bf-5c91-11e3-8c88-8f43aa31e915}"/> <WinreLocation path="\Recovery\WindowsRE" id="3609485342" offset="1048576" guid="{00000000-0000-0000-0000-000000000000}"/> <ImageLocation path="" id="0" offset="0" guid="{00000000-0000-0000-0000-000000000000}"/> <PBRImageLocation path="" id="0" offset="0" guid="{00000000-0000-0000-0000-000000000000}" index="0"/> <PBRCustomImageLocation path="" id="0" offset="0" guid="{00000000-0000-0000-0000-000000000000}" index="0"/> <InstallState state="1"/> <OsInstallAvailable state="0"/> <CustomImageAvailable state="0"/> <IsAutoRepairOn state="1"/> <WinREStaged state="0"/> <OperationParam path=""/> <OsBuildVersion path="9600.16384.amd64fre.winblue_rtm.130821-1623"/> <OemTool state="0"/> <IsServer state="0"/> <DownlevelWinreLocation path="" id="0" offset="0" guid="{00000000-0000-0000-0000-000000000000}"/> <ScheduledOperation state="5"/> </WindowsRE> |
Notice the “WinreBCD” ID number in the XML file. Its significance will be made clear later (in the section on BCD).
Managing Windows RE
Windows RE can managed using the \Windows\System32\ReAgentC.exe tool. This tool can manage the RE of the currently running OS and for some options even that of an offline OS. More information on ReAgentC.execommand can be found at this TechNet article. Here are some of the things ReAgentC can do:
ReAgentC /enableenables Windows RE.ReAgentC /disabledisables Windows RE.Both these switches work only against the currently running OS – i.e. you cannot make changes to an offline image. You can, however, boot into Windows PE and enable Windows RE for the OS installed on that computer. For this you’ll need the BCD GUID of the OS (get this via
bcdedit /enum /vorbcdedit /store R:\Boot\BCD /enum /vwhereR:\Boot\BCDis the path to the BCD store – this is usually the system partition for BIOS or the EFS partition for UEFI (it doesn’t have a drive letter so you have to mount it manually)). Once you have that, run the command as:ReAgentC /enable /osguid {603c0be6-5c91-11e3-8c88-8f43aa31e915}The
/enableoptions requires\Windows\System32\Recovery\(on the OS partition) to be present and have correct entries.ReAgentC /BootToREtells the boot loader to boot into Windows RE the next time this computer reboots. This too only works against the currently running OS – you cannot make changes to an offline image.ReAgentC /infogives the status of Windows RE for the currently running OS. Add a switch /target E:\Windows folder to get info for the OS installed on the E: drive (which could a partition on the disk or something you’ve mounted manually).ReAgentc.exe /SetREimage /path R:\Recovery\WindowsRE\tells the currently running OS that its Windows RE is at the specified path. In the example,R:\Recovery\WindowsREwould be the system partition or Windows RE tools partition that you’ll have mounted manually and this path contains thewinrm.wimfile. As before add a switch /target E:\Windows folder to set the recovery image for the OS installed on the E: drive.
Operation failed: 3
On my system ReAgentC was working fine until a few days ago but is now giving the following error:
|
1 2 3 |
REAGENTC.EXE: Operation failed: 3 REAGENTC.EXE: An error has occurred. |
I suspect I must have borked it somehow while making changes for a my previous post on Hyper-V but I can’t find anything to indicate a problem. Assuming I manage to fix it some time, I’ll post about it later.
BCD
I think it’s a good idea to talk about BCD when talking about Windows RE. The BCD is how the boot loader knows where to find Windows RE, and if the BCD entries for Windows RE are messed up it won’t work as expected.
BCD stands for Boot Configuration Data and it’s the Vista and upwards equivalent of boot.ini which we used to have in the XP and prior days.
Boot process difference between Windows XP (and prior) vs Windows Vista (and later)
Windows XP, Windows Server 2003, Windows Server 2000 had three files that were related to the boot process:
NTLDR(NT Loader) – which was the boot manager and boot loader, usually installed to the MBR (or to the PBR and chainloaded if you had GRUB and such in the MBR)NTdetect.com– which was responsible for detecting the hardware and passing this info to NTLDRBOOT.INI– a text file which contained the boot configuration (which partitions had which OS, how long to wait before booting, any kernel switches to pass on, etc) and was usually present along with NTLDR
From Windows Vista and up these are replaced with a new set of files:
BootMgr(Windows Boot Manager) – which a boot manager that is responsible for showing the boot options to the user and loading the available OSes. Under XP and prior this functionality was provided byNTLDR(which also loaded the OS) but now it’s a separate program of its own. WhileNTLDRused to read its options from theBOOT.INIfile,BootMgrreads its options from theBCDstore.BCD(Boot Configuration Data) – a binary file which replacesBOOT.INIand now contains the boot configuration data. This file has the same format as the Windows registry, and in fact once the OS is up and running the BCD is loaded underHKEY_LOCAL_MACHINE\BCD00000000.123456789101112131415161718192021222324252627282930313233343536373839404142434445464748495051525354555657PS C:\WINDOWS\system32> Get-ChildItem HKLM:\BCD00000000Hive: HKEY_LOCAL_MACHINE\BCD00000000Name Property---- --------Description KeyName : BCD00000000System : 1TreatAsSystem : 1GuidCache : {87, 113, 83, 166...}ObjectsPS C:\WINDOWS\system32> Get-ChildItem HKLM:\BCD00000000\Objects | select PSChildNamePSChildName-----------{0ce4991b-e6b3-4b16-b23c-5e0d9250e5d9}{1afa9c49-16ab-4a5c-901b-212802da9460}{4636856e-540f-4170-a130-a84776f4c654}{5189b25c-5558-4bf2-bca4-289b11bd29e2}{603c0be5-5c91-11e3-8c88-8f43aa31e915}{603c0be6-5c91-11e3-8c88-8f43aa31e915}{6efb52bf-1766-41db-a6b3-0ee5eff72bd7}{7ea2e1ac-2e61-4728-aaa3-896d9d0a9f0e}{7ff607e0-4395-11db-b0de-0800200c9a66}{91d1f9bf-5c91-11e3-8c88-8f43aa31e915}{91d1f9c0-5c91-11e3-8c88-8f43aa31e915}{9dea862c-5cdd-4e70-acc1-f32b344d4795}{a7a9f141-466a-11e3-bb15-efc8cd4a74a0}{a7a9f144-466a-11e3-bb15-efc8cd4a74a0}{a7a9f145-466a-11e3-bb15-efc8cd4a74a0}{b2721d73-1db4-4c62-bf78-c548a880142d}{e4960a47-64d7-11e4-bec6-c417feeee1af}{e4960a48-64d7-11e4-bec6-c417feeee1af}PS C:\WINDOWS\system32> $(.\bcdedit.exe /enum all /v ) -match "identifier"identifier {9dea862c-5cdd-4e70-acc1-f32b344d4795}identifier {603c0be6-5c91-11e3-8c88-8f43aa31e915}identifier {91d1f9bf-5c91-11e3-8c88-8f43aa31e915}identifier {603c0be5-5c91-11e3-8c88-8f43aa31e915}identifier {a7a9f141-466a-11e3-bb15-efc8cd4a74a0}identifier {e4960a47-64d7-11e4-bec6-c417feeee1af}identifier {e4960a48-64d7-11e4-bec6-c417feeee1af}identifier {b2721d73-1db4-4c62-bf78-c548a880142d}identifier {0ce4991b-e6b3-4b16-b23c-5e0d9250e5d9}identifier {4636856e-540f-4170-a130-a84776f4c654}identifier {5189b25c-5558-4bf2-bca4-289b11bd29e2}identifier {7ea2e1ac-2e61-4728-aaa3-896d9d0a9f0e}identifier {6efb52bf-1766-41db-a6b3-0ee5eff72bd7}identifier {7ff607e0-4395-11db-b0de-0800200c9a66}identifier {1afa9c49-16ab-4a5c-901b-212802da9460}identifier {91d1f9c0-5c91-11e3-8c88-8f43aa31e915}identifier {a7a9f144-466a-11e3-bb15-efc8cd4a74a0}identifier {a7a9f145-466a-11e3-bb15-efc8cd4a74a0}The
BCDis a binary file that’s stored in the EFS partition on UEFI systems or in the system partition in BIOS systems under the\Bootfolder (it’s a system hidden file so not visible by default). It is a binary file (unlikeBOOT.INIwhich is a text file) so the entries in it can’t be managed via notepad or any text editor. One has to use theBCDEdit.exetool that’s part of Windows or via third-party tools such as EasyBCD.winload.exe– I mentioned earlier that the boot manager functionality ofNTLDRis now taken up byBootMgr. What remains is the boot loader functionality – the task of actually loading the kernel and drivers from disk – and that is now taken care of bywinload.exe. In addition,winload.exealso does the hardware detection stuff that was previously done byNTdetect.com.
Vista: the misunderstood Windows
I think this is a good place to mention that while Windows Vista may have been a derided release from a consumer point of view, it was actually a very important release in terms of laying the foundations for future versions of Windows.
Once upon a time we had MS-DOS and Windows 3.x and Windows 95, 98, ME. These had a common set of technologies. Then there was Windows NT, which was different from the these.
Windows 2000 “married” Windows NT and Windows ME. It laid a new foundation upon which later OSes such Windows 2000, Windows XP, and Windows Server 2003 were based. All of these are based on Windows NT and have a common set of technologies. You know one of these, you can work around the others through a bit of trial and error. Some features may be added or missing, but more or less you can figure things out.
Then came Windows Vista and Server 2008. While these are still similar to Windows XP and Windows Server 2003, they are very different too in a lot of ways. Windows Vista and Server 2008 laid the foundations for changes that were further refined in Windows 7, Windows 8, Server 2008 R2, and so on. For instance changes such as WIM files, the boot process, UAC, deployment tools, CBS (Component Based Servicing), and so on. If the only thing you have worked on is Windows XP sure you can get around a bit with Windows Vista or 7, but as you start going deeper into things you’ll realize a lot of things are way different.
Back during the BOOT.INI days you specified disks and partitions in terms of numbers. The BIOS assigned numbers to disks and the BOOT.INI file had entries such as multi(0)disk(0)rdisk(0)partition(1)\WINDOWS which specified the Windows folder on a partition (in this case the 1st partition of the 1st disk) that was to be booted. This was simple and did the trick mostly, except for when you moved disks around or add/ deleted partitions. Then the entry would be out of date and the boot process will fail.
BCD does away with all this.
BCD uses the disk’s GPT identifier or MBR signature to identify the disk (so changing the order of disks won’t affect the boot process any more). Further, each boot entry is an object in the BCD file and these objects have unique GUIDs. (These are the objects I showed through the bcdedit.exe /enum all command above). The object contains the disk signature as well as the partition offset (the sector from where the partition starts on that disk) where it’s supposed to boot from. Thus to boot any entry all BootMgr needs to do is scan the connected disks for the one with the matching signature and then find the partition specified by the offset. This makes BCD independent of the disk numbers assigned by BIOS and it is unaffected by changes made to the order of disks.
A downside of BCD is that while with BOOT.INI one could move the OS to a different disk with the same partitioning and hope for it to boot, that won’t do with BCD as the disk signatures won’t match. BootMgr will scan for the disk signature in the BCD object, not find it, and complain that it cannot find the boot device and/ or winload.exe. (This is not a big deal because BCDEdit can be used to fix the record but it’s something to keep in mind).
Here’s the output from BCDEdit on my machine. There’s two sets of output here – one with a /v switch, the other without.
|
1 2 3 4 5 6 7 8 9 10 11 12 13 14 15 16 17 18 19 20 21 22 23 24 25 26 27 28 29 30 31 32 33 34 35 36 37 38 39 40 41 42 43 44 45 46 47 48 49 50 51 52 53 54 55 56 57 58 59 60 61 62 63 64 65 66 67 68 69 |
C:\Windows\System32>bcdedit /enum Windows Boot Manager -------------------- identifier {bootmgr} device partition=\Device\HarddiskVolume1 description Windows Boot Manager locale en-US inherit {globalsettings} integrityservices Enable default {current} resumeobject {603c0be5-5c91-11e3-8c88-8f43aa31e915} displayorder {current} toolsdisplayorder {memdiag} timeout 30 Windows Boot Loader ------------------- identifier {current} device partition=C: path \WINDOWS\system32\winload.exe description Windows 8.1 locale en-US inherit {bootloadersettings} recoverysequence {91d1f9bf-5c91-11e3-8c88-8f43aa31e915} integrityservices Enable recoveryenabled Yes allowedinmemorysettings 0x15000075 osdevice partition=C: systemroot \WINDOWS resumeobject {603c0be5-5c91-11e3-8c88-8f43aa31e915} nx OptIn bootmenupolicy Standard hypervisorlaunchtype Auto C:\Windows\System32>bcdedit /enum /v Windows Boot Manager -------------------- identifier {9dea862c-5cdd-4e70-acc1-f32b344d4795} device partition=\Device\HarddiskVolume1 description Windows Boot Manager locale en-US inherit {7ea2e1ac-2e61-4728-aaa3-896d9d0a9f0e} integrityservices Enable default {603c0be6-5c91-11e3-8c88-8f43aa31e915} resumeobject {603c0be5-5c91-11e3-8c88-8f43aa31e915} displayorder {603c0be6-5c91-11e3-8c88-8f43aa31e915} toolsdisplayorder {b2721d73-1db4-4c62-bf78-c548a880142d} timeout 30 Windows Boot Loader ------------------- identifier {603c0be6-5c91-11e3-8c88-8f43aa31e915} device partition=C: path \WINDOWS\system32\winload.exe description Windows 8.1 locale en-US inherit {6efb52bf-1766-41db-a6b3-0ee5eff72bd7} recoverysequence {91d1f9bf-5c91-11e3-8c88-8f43aa31e915} integrityservices Enable recoveryenabled Yes allowedinmemorysettings 0x15000075 osdevice partition=C: systemroot \WINDOWS resumeobject {603c0be5-5c91-11e3-8c88-8f43aa31e915} nx OptIn bootmenupolicy Standard hypervisorlaunchtype Auto |
Couple of things to note here.
First, notice what I meant about each entry being an “object”. As you can see each entry has properties and values – unlike in BOOT.INI days where everything was on a single line with spaces between options.
Second, the /enum switch shows all the active entries in BCD but by default skips the GUID for objects that are universal or known. For instance, the GUID for the boot manager is always {9dea862c-5cdd-4e70-acc1-f32b344d4795} so it replaces that with {default} in the output. Similarly it replaces the GUID for the currently loaded OS – which isn’t universal, but it’s known as it’s the currently loaded one – with {current}. BCDEdit does this to make it easier for the end user to read the output and/ or to refer to these objects when making changes. If you don’t want such “friendly” output use the /v switch like I did in the second case above.
The registry stores the objects as GUIDs. So if I were to take the GUID of the currently running system from the output above and look at the registry I’ll see similar details:
|
1 2 3 4 5 6 7 8 9 10 11 12 13 14 15 16 17 18 19 20 21 22 23 |
PS C:\WINDOWS\system32> Get-ChildItem 'HKLM:\BCD00000000\Objects\{603c0be6-5c91-11e3-8c88-8f43aa31e915}\Elements' Hive: HKEY_LOCAL_MACHINE\BCD00000000\Objects\{603c0be6-5c91-11e3-8c88-8f43aa31e915}\Elements Name Property ---- -------- 11000001 Element : {0, 0, 0, 0...} 12000002 Element : \WINDOWS\system32\winload.exe 12000004 Element : Windows 8.1 12000005 Element : en-US 14000006 Element : {{6efb52bf-1766-41db-a6b3-0ee5eff72bd7}} 14000008 Element : {{91d1f9bf-5c91-11e3-8c88-8f43aa31e915}} 1500004b Element : {1, 0, 0, 0...} 16000009 Element : {1} 17000077 Element : {117, 0, 0, 21...} 21000001 Element : {0, 0, 0, 0...} 22000002 Element : \WINDOWS 23000003 Element : {603c0be5-5c91-11e3-8c88-8f43aa31e915} 25000020 Element : {0, 0, 0, 0...} 250000c2 Element : {1, 0, 0, 0...} 250000f0 Element : {1, 0, 0, 0...} |
Going back to the BCDEdit output if we compare the device entries for the {bootmgr} and {current} entries we can see it’s represented as partition=\Device\HarddiskVolume1 for the {bootmgr} entry and the friendlier drive letter version partition=C: for the {current} entry (because the partition has a drive letter). BCD starts the volume from 1 so \Device\HarddiskVolume1 refers to the first partition of all the disks on the computer. This is worth emphasising. The \Device\HarddiskVolumeNN representation is not how BCD stores the data internally. Internally BCD uses the disk signature and offset as mentioned earlier, but when displaying to the end-user it uses a friendlier format like \Device\HarddiskVolume1 or a drive letter.
If we compare the registry output above to the corresponding BCD output we can see the partition+disk information represented differently.
Another thing worth noting with the BCDEdit output is that it classifies the output. The first entry is BOOTMRG so it puts it under the section of “Windows Boot Manager”. Subsequent entries are boot loaders so they are put under “Windows Boot Loader”. There’s only one active entry in my system but if I had more entries they too would appear here.
Note that I said there’s only one active entry in my system. There are actually many more entries but these are not active. For instance, there’s an entry to boot into Windows RE but that’s not shown by default. To see all these other entries the /enum switch takes various parameters. For example: /enum osloader shows all OS loading entries, /enum bootmgr shows BOOTMGR, /enum resume shows hibernation resume entries, and so on. To show every entry in the BCD use the switch /enum all (and to see what other options are present do /enum /? to get help).
|
1 2 3 4 5 6 7 8 9 10 11 12 13 14 15 16 17 18 19 20 21 22 23 24 25 26 27 28 29 30 31 32 33 34 35 36 37 38 |
C:\Windows\System32>bcdedit /enum osloader Windows Boot Loader ------------------- identifier {current} device partition=C: path \WINDOWS\system32\winload.exe description Windows 8.1 locale en-US inherit {bootloadersettings} recoverysequence {91d1f9bf-5c91-11e3-8c88-8f43aa31e915} integrityservices Enable recoveryenabled Yes allowedinmemorysettings 0x15000075 osdevice partition=C: systemroot \WINDOWS resumeobject {603c0be5-5c91-11e3-8c88-8f43aa31e915} nx OptIn bootmenupolicy Standard hypervisorlaunchtype Auto Windows Boot Loader ------------------- identifier {91d1f9bf-5c91-11e3-8c88-8f43aa31e915} device ramdisk=[\Device\HarddiskVolume1]\Recovery\WindowsRE\Winre.wim,{91d1f9c0-5c91-11e3-8c88-8f43aa31 e915} path \windows\system32\winload.exe description Windows Recovery Environment locale en-US inherit {bootloadersettings} displaymessage Recovery displaymessageoverride Recovery osdevice ramdisk=[\Device\HarddiskVolume1]\Recovery\WindowsRE\Winre.wim,{91d1f9c0-5c91-11e3-8c88-8f43aa31 e915} systemroot \windows nx OptIn bootmenupolicy Standard winpe Yes |
Notice the Windows RE entry above. And notice that its GUID matches that in the ReAgent.xml file of Windows RE.
On my machine I had one more entry initially:
|
1 2 3 4 5 6 7 8 9 10 11 12 13 14 15 |
Windows Boot Loader ------------------- identifier {a7a9f143-466a-11e3-bb15-efc8cd4a74a0} device ramdisk=[\Device\HarddiskVolume1]\Recovery\a7a9f143-466a-11e3-bb15-efc8cd4a74a0\Winre.wim,{a7a9f144-466a-11e3-bb15-efc8cd4a74a0} path \windows\system32\winload.exe description Windows Recovery Environment locale en-US inherit {bootloadersettings} displaymessage Recovery displaymessageoverride Recovery osdevice ramdisk=[\Device\HarddiskVolume1]\Recovery\a7a9f143-466a-11e3-bb15-efc8cd4a74a0\Winre.wim,{a7a9f144-466a-11e3-bb15-efc8cd4a74a0} systemroot \windows nx OptIn bootmenupolicy Standard winpe Yes |
This is an incorrect entry because the GUID of this entry doesn’t match the Windows RE GUID in the ReAgent.xml file so I deleted it:
|
1 |
C:\>bcdedit /delete {a7a9f143-466a-11e3-bb15-efc8cd4a74a0} |
Speaking of Windows RE, one of the things we can do from Windows RE (and only from Windows RE!) is repair the MBR, boot sector, and BCD with a tool called Bootrec. To fix only the MBR there’s a tool called bootsect which is available in Windows 8 and above (or Windows PE in case of Windows 7). This tool can replace the MBR with BOOTMGR or NTLDR compatible code and is often useful for fixing unbootable systems.
Another useful tool to be aware of is BCDBoot. This tool is used to create a new BCD store and/ or install the boot loader and related files. I used this tool in a previous posts to install the UEFI bootloader and the BIOS bootloader.
Before I conclude I’d like to link to three posts by Mark Minasi on BCD. They go into similar material as what I did above but I feel are better presented (they talk about the various switches for instance, whereas I just mention them in passing):
Finally, BCDEdit too supports options like you could set in BOOT.INI (for example: use a standard VGA driver, disable/ enable PAE, disable/ enable DEP). You set these options via the bcdedit /set {GUID} ... switch, wherein {GUID} is the ID of the boot entry you want to make the settings on and ... is replaced with the options you want to change. See this MSDN article for more information on the options and how to set them. Common BOOT.INI settings and their new equivalents can be found at this MSDN article.
That’s all for now!